
Planet Python
Last update: May 09, 2024 01:43 PM UTC
May 09, 2024
Robin Wilson
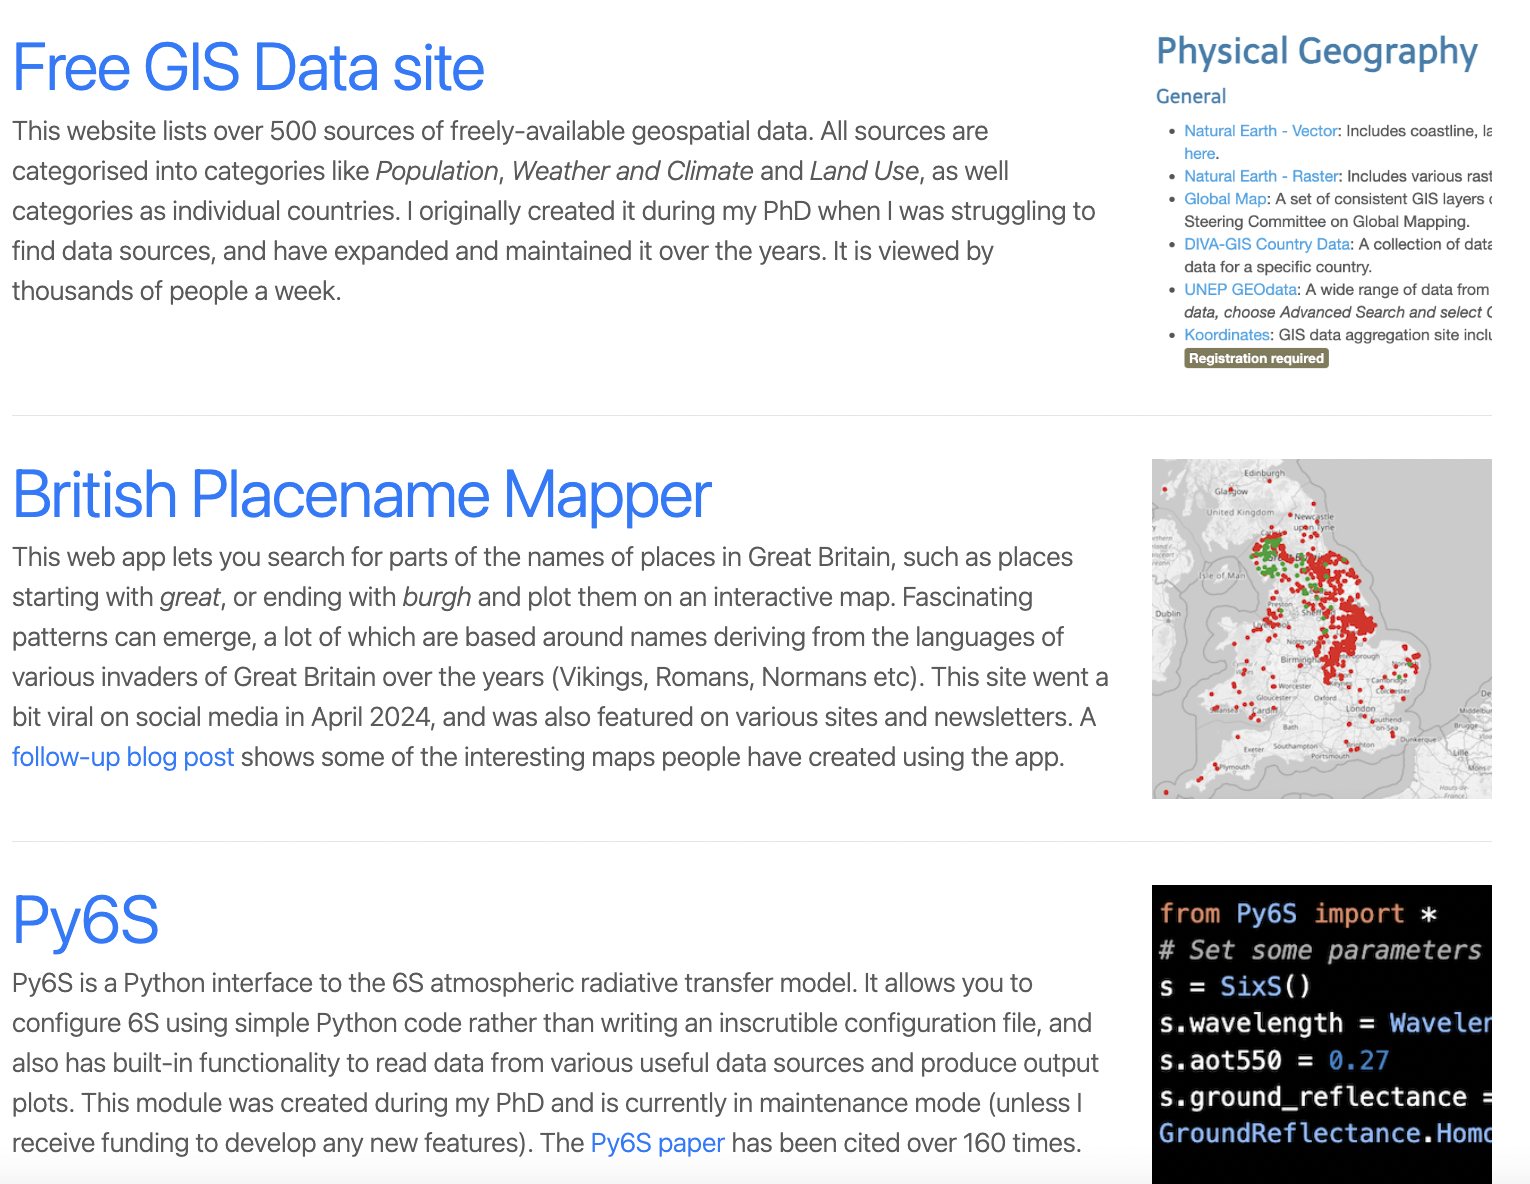
New Projects page on my website
Just a quick post here to say that I’ve added a new Projects page to my freelance website. I realised I didn’t have anywhere online that I could point people to that had links to all of the ‘non-work’ (maybe that should be ‘non-paid’) projects I’ve made.
These projects include my Free GIS Data site, the British Placename Mapper, Py6S and more. I’ve also put together a separate page (linked from the projects page) with all my university theses (PhD, MSc and undergraduate) and other university work – which still get a remarkably high number of downloads.
Have a look here, or see a screenshot of the first few entries below:
May 08, 2024
Trey Hunner
My favorite Python 3.13 feature
Python 3.13 just hit feature freeze with the first beta release today.
Just before the feature freeze, a shiny new feature was added: a brand new Python REPL. ✨
This new Python REPL is will likely be my favorite thing about 3.13. It’s definitely the feature I’m most looking forward to using while teaching after 3.13.0 final is released later this year.
I’d like to share what’s so great about this new REPL and what additional improvements I’m hoping we might see in future Python releases.
Little niceties
The first thing you’ll notice when you launch the new REPL is the colored prompt.

You may also notice that as you type a block of code, after the first indented line, the next line will be auto-indented!
Additionally, hitting the Tab key inserts 4 spaces now, which means there’s no more need to ever hit Space Space Space Space to indent ever again.
At this point you might be thinking, “wait did I accidentally launch ptpython or some other alternate REPL?” But it gets even better!
You can “exit” now
Have you ever typed exit at the Python REPL?
If so, you’ve seen a message like this:
1 2 | |
That feels a bit silly, doesn’t it?
Well, typing exit will exit immediately.

Typing help also enters help mode now (previously you needed to call help() as a function).
Block-level history
The feature that will make the biggest different in my own usage of the Python REPL is block-level history.

I make typos all the time while teaching. I also often want to re-run a specific block of code with a couple small changes.
The old-style Python REPL stores history line-by-line. So editing a block of code in the old REPL required hitting the up arrow many times, hitting Enter, hitting the up arrow many more times, hitting Enter, etc. until each line in a block was chosen. At the same time you also needed to make sure to edit your changes along the way… or you’ll end up re-running the same block with the same typo as before!
The ability to edit a previously typed block of code is huge for me. For certain sections of my Python curriculum, I hop into ptpython or IPython specifically for this feature. Now I’ll be able to use the default Python REPL instead.
Pasting code just works
The next big feature for me is the ability to paste code.
Check this out:

Not impressed? Well, watch what happens when we paste that same block of code into the old Python REPL:

The old REPL treated pasted text the same as manually typed text. When two consecutive newlines were encountered in the old REPL, it would end the current block of code because it assumed the Enter key had been pressed twice.
The new REPL supports bracketed paste, which is was invented in 2002 and has since been adopted by all modern terminal emulators.
No Windows support? Curses!
Unfortunately, this new REPL doesn’t currently work on Windows.
This new REPL relies on the curses and readline modules, neither of which are available on Windows.
I’m hoping that this new REPL might encourage the addition of curses support on Windows (there are multiple issues discussing this).
The in-browser Python REPL on Python Morsels also won’t be able to use the new REPL because readline and curses aren’t available in the WebAssembly Python build.
Beta test Python 3.13 to try out the new REPL 💖
Huge thanks to Pablo Galindo Salgado, Łukasz Langa, and Lysandros Nikolaou for implementing this new feature! And thanks to Michael Hudson-Doyle and Armin Rigo for implementing the original version of this REPL, which was heavily borrowed from PyPy’s pyrepl project.
The new Python REPL coming in 3.13 is a major improvement over the old REPL. While the lack of Windows support is disappointing, but I’m hopeful that a motivated Windows user will help add support eventually!
Want to try out this new REPL? Download and install Python 3.13.0 beta 1!
Beta testing new Python releases helps the Python core team ensure the final release of 3.13.0 is as stable and functional as possible. If you notice a bug, check the issue tracker to see if it’s been reported yet and if not report it!
Python Insider
Python 3.13.0 beta 1 released
I'm pleased to announce the release of Python 3.13 beta 1 (and feature freeze for Python 3.13).
https://www.python.org/downloads/release/python-3130b1/
This is a beta preview of Python 3.13
Python 3.13 is still in development. This release, 3.13.0b1, is the first of four beta release previews of 3.13.
Beta release previews are intended to give the wider community the opportunity to test new features and bug fixes and to prepare their projects to support the new feature release.
We strongly encourage maintainers of third-party Python projects to test with 3.13 during the beta phase and report issues found to the Python bug tracker as soon as possible. While the release is planned to be feature complete entering the beta phase, it is possible that features may be modified or, in rare cases, deleted up until the start of the release candidate phase (Tuesday 2024-07-30). Our goal is to have no ABI changes after beta 4 and as few code changes as possible after 3.13.0rc1, the first release candidate. To achieve that, it will be extremely important to get as much exposure for 3.13 as possible during the beta phase.
Please keep in mind that this is a preview release and its use is not recommended for production environments.
Major new features of the 3.13 series, compared to 3.12
Some of the new major new features and changes in Python 3.13 are:
New features
- A new and improved interactive interpreter, based on PyPy’s, featuring multi-line editing and color support, as well as colorized exception tracebacks.
- An experimental free-threaded build mode, which disables the Global Interpreter Lock, allowing threads to run more concurrently.
- A preliminary, experimental JIT, providing the ground work for significant performance improvements.
- The (cyclic) garbage collector is now incremental, which should mean shorter pauses for collection in programs with a lot of objects.
- A modified version of mimalloc is now included, optional but enabled by default if supported by the platform, and required for the free-threaded build mode.
- Docstrings now have their leading indentation stripped, reducing memory use and the size of .pyc files. (Most tools handling docstrings already strip leading indentation.)
- The dbm module has a new dbm.sqlite3 backend that is used by default when creating new files.
Typing
- Support for type defaults in type parameters.
- A new type narrowing annotation,
typing.TypeIs. - A new annotation for read-only items in TypeDicts.
Removals and new deprecations
- PEP 594 (Removing dead batteries from the standard library) scheduled removals of many deprecated modules:
aifc,audioop,chunk,cgi,cgitb,crypt,imghdr,mailcap,msilib,nis,nntplib,ossaudiodev,pipes,sndhdr,spwd,sunau,telnetlib,uu,xdrlib,lib2to3. - Many other removals of deprecated classes, functions and methods in various standard library modules.
- C API removals and deprecations. (Some removals present in alpha 1 were reverted in alpha 2, as the removals were deemed too disruptive at this time.)
- New deprecations, most of which are scheduled for removal from Python 3.15 or 3.16.
(Hey, fellow core developer, if a feature you find important is missing from this list, let Thomas know.)
For more details on the changes to Python 3.13, see What’s new in Python 3.13. The next pre-release of Python 3.13 will be 3.13.0b2, currently scheduled for 2024-05-28.
More resources
- Online Documentation
- PEP 719, 3.13 Release Schedule
- Report bugs at Issues · python/cpython · GitHub.
- Help fund Python directly (or via GitHub Sponsors), and support the Python community.
Enjoy the new releases
Thanks to all of the many volunteers who help make Python Development and these releases possible! Please consider supporting our efforts by volunteering yourself or through organization contributions to the Python Software Foundation.
Your release team,
Thomas Wouters
Łukasz Langa
Ned Deily
Steve Dower
Daniel Roy Greenfeld
TIL: Running UV outside a virtualenv
Breaking the rules to satisfy continuous integration.
A few months ago I blogged about forcing pip to require a virtualenv. However, when automating tests and deployments sometimes you work outside of virtualenvs. With pip this isn't a problem, you just don't set what I did in that article. However, what if you are using the rust-based uv where the default is to keep you in a virtualenv?
The answer is when you install dependencies using uv in this scenario, use the --python flag to specify the interpreter. According to the uv docs, this flag is intended for use in continuous integration (CI) environments or other automated workflows.
So without further ado, this is what I did:
python -m pip install uv
uv pip install -p 3.12 -r requirements.txt
As a bonus, here's the command inside GitHub actions-flavored YAML:
    - name: Install Dependencies
      run: |
        python -m pip install uv
        uv pip install -p 3.12 -r requirements.txt
Want to know how to handle multiple versions of Python? Here's how use a matrix on GitHub: https://github.com/pydanny/dj-notebook/blob/main/.github/workflows/python-ci.yml#L18-L19
The Python Show
40 - Open Source Development with Antonio Cuni
In this episode, we discuss working on several different open-source Python packages. Antonio Cuni is our guest, and he chats about his work on PyScript, pdb++, pypy, HPy, and SPy.
Listen in as we chat about Python, packages, open source, and so much more!
Show Links
Here are some of the projects we talked about in the show:
The Invent Framework
pdb++ - A drop-in replacement for pdb
pypy - The fast, compliant, alternative Python implementation
HPy - A better C API for Python
SPy - Static Python
Real Python
PyTorch vs TensorFlow for Your Python Deep Learning Project
PyTorch vs TensorFlow: What’s the difference? Both are open-source Python libraries that use graphs to perform numerical computations on data in deep learning applications. Both are used extensively in academic research and commercial code. Both are extended by a variety of APIs, cloud computing platforms, and model repositories.
If they’re so similar, then how do you decide which one is best for your project?
In this tutorial, you’ll learn:
- What the differences are between PyTorch and TensorFlow
- What tools and resources are available for each
- How to choose the best option for your specific use case
You’ll start by taking a close look at both platforms, beginning with the slightly older TensorFlow. Then, you’ll explore PyTorch and some considerations to help you determine which choice is best for your project. Let’s get started!
Get Your Decision Guide: Click here to download the free decision guide that will help you choose between PyTorch and TensorFlow for your Python deep learning project.
What Is TensorFlow?
TensorFlow was developed by Google and released as open-source in 2015. It grew out of Google’s homegrown machine learning software, which was refactored and optimized for use in production.
The name “TensorFlow” describes how you organize and perform operations on data. The basic data structure for both TensorFlow and PyTorch is a tensor. When you use TensorFlow, you perform operations on the data in these tensors by building a stateful dataflow graph, kind of like a flowchart that remembers past events.
Who Uses TensorFlow?
TensorFlow has a reputation for being a production-grade deep learning library. It has a large and active user base and a proliferation of official and third-party tools and platforms for training, deploying, and serving models.
After PyTorch was released in 2016, TensorFlow declined in popularity. But in late 2019, Google released TensorFlow 2.0—a major update that simplified the library and made it more user-friendly, leading to renewed interest among the machine learning community.
Code Style and Function
In TensorFlow 2.0, you can use eager execution, which is how Python normally works. Eager execution evaluates operations immediately, so you can write your code using Python control flow rather than graph control flow. To see this in action, you’ll take a look at how you would multiply two tensors using both Tensorflow 1.0 and 2.0.
To start, here’s an example of how to multiply tensors using TensorFlow 2.0. With eager execution, all you need is tf.math.multiply():
>>> import tensorflow as tf

>>> x = [[2., 4., 6.]]
>>> y = [[1.], [3.], [5.]]
>>> m = tf.math.multiply(x, y)

>>> m
<tf.Tensor: shape=(3, 3), dtype=float32, numpy=
array([[ 2.,  4.,  6.],
       [ 6., 12., 18.],
       [10., 20., 30.]], dtype=float32)>
In this code, you declare your tensors using Python’s list notation, and tf.math.multiply() executes the element-wise multiplication immediately when you call it.
Before TensorFlow 2.0, you had to manually stitch together an abstract syntax tree by making tf.* API calls. You then had to pass a set of output tensors and input tensors to a session.run() call and manually compile the model.
A Session object is a class for running TensorFlow operations. It contains the environment in which Tensor objects are evaluated and Operation objects are executed, and it can own resources like tf.Variable objects. The most common way to use a Session is as a context manager.
To see how a Session is used in this way, here’s an example of how you multiply two tensors using the old TensorFlow 1.0 method:
>>> import tensorflow as tf

>>> tf.compat.v1.disable_eager_execution()

>>> x = tf.compat.v1.placeholder(tf.float32, name = "x")
>>> y = tf.compat.v1.placeholder(tf.float32, name = "y")

>>> multiply = tf.math.multiply(x, y)

>>> with tf.compat.v1.Session() as session:
...     m = session.run(
...         multiply, feed_dict={x: [[2., 4., 6.]], y: [[1.], [3.], [5.]]}
...     )
...     print(m)
[[ 2.  4.  6.]
 [ 6. 12. 18.]
 [10. 20. 30.]]
This code uses TensorFlow 2.x’s tf.compat API to access TensorFlow 1.x methods and disable eager execution.
You first declare the input tensors x and y using tf.compat.v1.placeholder tensor objects. Then you define the operation to perform on them. Note that nothing has been calculated at this point.
Next, using the tf.Session object as a context manager, you create a container to encapsulate the runtime environment and do the multiplication by feeding real values into the placeholders with a feed_dict. Finally, still inside the session, you print() the result.
Note: Keep in mind that because TensorFlow 1.0 has been deprecated, it probably isn’t the best option for your future projects, and you should stick with using TensorFlow 2.0.
Read the full article at https://realpython.com/pytorch-vs-tensorflow/ »
[ Improve Your Python With 🐍 Python Tricks 💌 – Get a short & sweet Python Trick delivered to your inbox every couple of days. >> Click here to learn more and see examples ]
Python Software Foundation
PSF Grants Program 2022 & 2023 Transparency Report
The PSF’s Grants Program is a key plank in our charitable mission to promote,
protect, and advance the Python programming language, and to support and
facilitate the growth of a diverse and international community of Python
programmers. After much research, input, and analysis, we are pleased to share
a PSF Grants Program 2022 & 2023 Transparency Report. The report includes
context, numbers, analysis, and a proposed path forward. It also includes a
supplemental analysis of several specific grant applications for which we were
requested to share more information.
We feel it is important to
acknowledge that Pythonistas, regional communities, and the broader community
are behind these statistics and commentary. Our community called for this
report to be created. While the report is focused on data and outcomes, we
also feel it is important to acknowledge in this introduction the concerns and
frustrations that brought us here, explained further in the ‘Setting context’
section below. We hope that this report, along with many other steps, helps to
remediate this.
This report reflects the outcome of thousands of
hours of PSF and volunteer efforts over 2022 and 2023 by the Grants Working
Group, the PSF Board, Python organizers, and PSF Staff worldwide. We truly
value this opportunity to share information on the last two years of
increasing grants to the community and to improve our Grants Program while
honoring the hard work of everyone involved in making the Program and our
mission possible.
This report was compiled by PSF Staff and
reviewed by the PSF Board and Grants Working Group. If you have questions,
comments, or feedback about the Grants Program or this report, please email
grants@pyfound.org.
Setting context
In December of 2023, we received an
open letter
from a coalition of organizers from the pan-African Python community asking
the PSF to address concerns and frustrations around our Grants Program. Before
receiving the letter, the PSF Board was aware of the Grant application that
spurred this letter and published a
transparency blog post
regarding the September and October 2023 Board votes concerning that
application. PSF Staff were aware of a need for a refresh of Grants Program
documentation and processes and worked on these updates time allowing. Since
receiving the letter in December, the PSF Board and Staff have:
- Spent time listening during many discussions with the letter writers and other community members.
- Re-prioritized reviewing and rewriting Grant-related documentation and processes, including revisiting the Grants Working Group Charter.
- Established monthly Grants Program Office Hours.
- Contracted Carol Willing to perform a DjangoCon Africa Grants Process Retrospective which is now available on the PSF Blog.
For a high-level idea of the scope of our Grants Program, we are happy
to share:
- The PSF distributed $393K in Grants during 2022 and $623K during 2023 for the Grants Program and the PyCon US Travel Grants Program combined.
- The Grants Program distributed $215K in Grants during 2022 and $393K during 2023.
-
Noting this Transparency Report is focused on the Grants Program only. If
you want to learn more about travel grants check out the
Travel Grants Process for PyCon US 2024 blog post
on the PyCon US blog.
The growth we saw from 2022 to 2023 is exciting to reflect on, and we’re
looking forward to what 2024 and beyond has in store for our Grants Program!

The numbers (in graph form)
Thanks to Tania Allard for helping improve the readability and accessibility of the graphs provided in this report.
Our analysis
General Trends, Observations, & Notes
- In 2022, Grants requests were not at “full capacity” as our community was still recovering from the impact of COVID-19 on events, initiatives, and collective burnout.
- The increase in total grant applications we received from 2023 over 2022 is encouraging. The program grew in 2023 as we began to return to in-person and hybrid events, and we anticipate more applications coming in throughout 2024 and beyond.
Number of Total Grant Applications by Continent
- In both 2022 & 2023, we received the most number of applications from Africa and Europe, with South America not far behind.
Percentage of Grants Approved
- The percentage of approved vs. declined applications is reasonable. Some reasons applications were denied include:
- Unable to meet PSF Grants Program criteria
- Unclear benefit to funding the application
- Not Python related
- Spam
Percentage of Grant Applications by Continent
- The percentages across continents are reasonably balanced, with fewer applications from Asia, North America, and Oceania. Based on the distribution of populations globally, the percentage of applications from Asia is lower than expected. After receiving input on this directly from PyCon organizers from Asia, we have come to understand that this is based on an approach focused on sustainability. PyCon organizers in Asia are focused on local sponsorship, fiscal responsibility, and independence. We absolutely commend this approach, and at the same time, we urge organizers from Asia to request Grant funding to supplement and enhance their events.
- Additionally, note that we cannot award Grants to certain countries in Asia due to OFAC and our status as a US-based 501c3 non-profit.
Approved & Declined Grant Applications by Continent
- The number of declined applications from Africa shows an area for improvement. Our conclusion is that our documentation is not clear enough on the requirements for a grant to be awarded and that results in applications that will not pass.
Dollar Amount Granted by Continent & Percentage of Money Granted by Continent
- This graph appears to show that Europe received disproportionate funding. On further review, we believe this is because the grant applications we got from Europe were for conferences. In contrast, a large number of the grant applications from other regions were for meetups and workshops, including many Django Girls events. Conferences typically cost significantly more than meetups. Here’s a breakdown:
| Continent | Applications Received in 2022 | Granted in 2022 | Applications Received in 2023 | Granted in 2023 |
|---|---|---|---|---|
| Africa | 4 conferences, 7 meetups | 3 conferences, 7 meetups | 7 Conferences, 16 meetups | 5 conferences, 13 meetups |
| Europe | 12 conferences, 1 meetup | 11 conferences, 1 meetup | 15 conferences, 2 meetups | 15 conferences, 2 meetups |
- We are encouraged to see the dollar amount granted to the Africa region rise significantly between 2022 and 2023.
Average Amount Granted by Continent
- Oceania is an outlier; the PSF received one application in 2022 and two in 2023 from Oceania. Many more grants were awarded to other regions, which caused their average dollar amount to be lower. With that in mind, we feel the average is reasonable. It means that we are receiving both large and small grant applications!
- Africa and South America received less on average than other regions. This is another example of the typical types of grant requests we are receiving from different regions (workshops and meetups vs. large conferences).
Grant Decision Times in Weeks by Number & Percentage of Applications
- The majority of the average grant review period is 4 weeks, which we feel is reasonable based on the process and load of grant applications we receive.
- When we reviewed applications that took longer than 4 weeks to decide, we found a couple of scenarios.
- One of the main reasons for longer decision times is that applications are sometimes submitted without crucial information, and there is significant time spent on communications between applicants, PSF Staff, and the Grants Working Group. Once requested, there are often delays in receiving the required information back from applicants.
- The grant application was escalated to the Board who meet on a monthly basis. Grants can be escalated to the Board either because the amount requested is greater than $10,000 or because the Grants Working Group cannot reach a consensus on a decision.
Grant Program Average Days to Decide by Continent
- This graph also shows Oceania as an outlier, and, again, it is skewed because we received only one application in 2022 and only two in 2023 applications from that region.
- In 2023, applications from Asia took longer to reach decisions. When we looked into this further, we found that the reasons for delays were that applications were submitted without the required information and that significant time was spent on communications between applicants, PSF Staff, and the Grants Working Group.
- We are pleased to see that the average number of days is very close across most regions.
Supplemental information on specific grant requests
The open letter we received from the pan-African Python
community asked us to specifically review the process and share information
about several older grant applications from 2018, 2019, and 2022. We want to
share as much information as possible while noting that some of these requests
were managed by folks who have since moved on from the PSF and Grants Working
Group (GWG).
Introducing Python and related technologies to more high schools in Uganda (2018)
- Grant request submitted January 2nd, 2018
- Requesting funding for four events in different schools for the 7-9 February, 12-14 February, 19-21 February, 26 Feb-1 March, of 2018.
- GWG Chair forwarded request to the GWG January 4th
- GWG reviewed and needed more information
- GWG Chair requested more information and forwarded that to GWG on January 12th
- GWG Chair acknowledged to the GWG on February 7th that the request was dropped
- No further comments added or actions taken
PyLadies Fest in Kampala, Uganda (2019)
- Grant request submitted February 21st, 2019
- Requesting funding for a five day event starting on May 6th, 2019
- GWG Chair requested more information
- GWG Chair forwarded request and additional information to the GWG on March 25th
- GWG reviewed and needed more information
- GWG Chair requested more information and forwarded a reply to GWG on April 26th saying the grant requestor was working on solidifying the necessary information
- GWG Chair forwarded additional information to the GWG on July 10th and advised the GWG the event was rescheduled for September 16th
- No further comments added or actions taken
PyLadies Kampala Open Source Workshop (2022)
- Grant request submitted September 20, 2022
- Requesting funding for a one day event for November 26th, 2022.
- GWG Chair requested more information, which was provided on September 26th
- GWG Chair forwarded request to GWG on October 20th
- GWG reviewed and no one objected
- GWG Chair moved the request to a vote on October 31st
- Board Member contacted PSF Staff for an update on November 2nd
- GWG approved the request and the GWG Chair sent the Resolution to the grant requester on November 3rd
Our comments
We do not have many insights into the administration of these
Grant requests outside of what exists on the GWG mailing list, including any
off list emails or in-person conversations that might have occurred. The PSF
Staff administering the GWG for the grant requests from 2018 and 2019 are no
longer on the team. The request from 2022, which was approved, was 2 days over
our goal of 6 week turnaround time for decisions on grant applications.
While our staff roster is currently small, it was even smaller in
2018 and 2019. We realized some time ago that as our grant requests increased
having a solo administrator for the GWG was tough- it was hard for our staff
to catch a break! When we put out a call for a Community Communications
Manager in June of 2023, we planned for whoever stepped into that role to be a
second administrator for the GWG to always have a stopgap at the ready. Our
current administration for the GWG now includes two PSF Staff members. This is
done purposefully to avoid situations where applications get dropped because a
critical piece of information comes just as someone is scheduled to be out of
the office or an emergency happens.
A path forward
Some of our
goals:
- Review, rewrite, and improve the Grants Working Group Charter, including exploring various decision-making options and criteria.
- Review, rewrite, and improve documentation so that:
- Applicants can be confident that their application meets the Grants Program criteria before submitting.
- Reduce the need for follow-ups for additional information that can cause delays.
- Continue to host the PSF Grants Program Office Hours to increase ongoing transparency, support grant applicants, and understand the gaps in our documentation.
- Analyze and deliberate on the equity of designating grant funding allocated by region.
- Explore ways that the PSF could regularly support the organization of large-scale events in underserved regional communities.
- Examine and update our processes regarding timeframes, including escalating grant applications after 4 weeks of review to avoid 8-week review periods.
- We’d like to receive more applications in the future by continuing to publicize the opportunity and providing support during our Office Hours.
- Revisit the effectiveness and sustainability of the Grants Program yearly.
A final note
We
hope this transparency report will help our community understand the state of
our Grants Program over the last two years. It has been instructive to the
Board, the Grants Working Group, and our staff who administer the program to
understand where our strengths and weaknesses lay. This report will inform our
efforts as we progress with improvements to the Grants Program. We also feel
this exercise will continue to be helpful year over year, to both monitor the
health of and analyze how our improvement efforts have impacted the success of
the Grants Program.
If you have any questions, comments, or
feedback, please email grants@pyfound.org.
May 07, 2024
Glyph Lefkowitz
Hope
Humans are pattern-matching machines. As a species, it is our superpower. To summarize the core of my own epistemic philosophy, here is a brief list of the activities in the core main-loop of a human being:
- stuff happens to us
- we look for patterns in the stuff
- we weave those patterns into narratives
- we turn the narratives into models of the world
- we predict what will happen based on those models
- we do stuff based on those predictions
- based on the stuff we did, more stuff happens to us; return to step 1
While this ability lets humans do lots of great stuff, like math and physics and agriculture and so on, we can just as easily build bad stories and bad models. We can easily trick ourselves into thinking that our predictive abilities are more powerful than they are.
The existence of magic-seeming levels of prediction in fields like chemistry and physics and statistics, in addition to the practical usefulness of rough estimates and heuristics in daily life, itself easily creates a misleading pattern. “I see all these patterns and make all these predictions and I’m right a lot of the time, so if I just kind of wing it and predict some more stuff, I’ll also be right about that stuff.”
This leaves us very vulnerable to things like mean world syndrome. Mean world syndrome itself is specifically about danger, but I believe it is a manifestation of an even broader phenomenon which I would term “the apophenia of despair”.
Confirmation bias is an inherent part of human cognition, but the internet has turbocharged it. Humans have immediate access to more information than we ever had in the past. In order to cope with that information, we have also built ways to filter that information. Even disregarding things like algorithmic engagement maximization and social media filter bubbles, the simple fact that when you search for things, you are a lot more likely to find the thing that you’re searching for than to find arguments refuting it, can provide a very strong sense that you’re right about whatever you’re researching.
All of this is to say: if you decide that something in the world is getting worse, you can very easily convince yourself that it is getting much, much worse, very rapidly. Especially because there are things which are, unambiguously, getting worse.
However, Pollyanna-ism is just the same phenomenon in reverse and I don’t want to engage in that. The ice sheets really are melting, globally, fascism really is on the rise. I am not here to deny reality or to cherry pick a bunch of statistics to lull people into complacency.
I believe that while dwelling on a negative reality is bad, I also believe that in the face of constant denial, it is sometimes necessary to simply emphasize those realities, however unpleasant they may be. Distinguishing between unhelpful rumination on negativity and repetition of an unfortunate but important truth to correct popular perception is subjective and subtle, but the difference is nevertheless important.
As our ability to acquire information about things getting worse has grown, our ability to affect those things has not. Knowledge is not power; power is power, and most of us don’t have a lot of it, so we need to be strategic in the way that we deploy our limited political capital and personal energy.
Overexposure to negative news can cause symptoms of depression; depressed people have reduced executive function and find it harder to do stuff. One of the most effective interventions against this general feeling of malaise? Hope.. Not “hope” in the sense of wishing. As this article in the American Psychological Association’s “Monitor on Psychology” puts it:
“We often use the word ‘hope’ in place of wishing, like you hope it rains today or you hope someone’s well,” said Chan Hellman, PhD, a professor of psychology and founding director of the Hope Research Center at the University of Oklahoma. “But wishing is passive toward a goal, and hope is about taking action toward it.”
Here, finally, I can get around to my point.
If you have an audience, and you have some negative thoughts about some social trend, talking about it in a way which is vague and non-actionable is potentially quite harmful. If you are doing this, you are engaged in the political project of robbing a large number of people of hope. You are saying that the best should have less conviction, while the worst will surely remain just as full of passionate intensity.
I do not mean to say that it is unacceptable to ever publicly share thoughts of sadness, or even hopelessness. If everyone in public is forced to always put on a plastic smile and pretend that everything is going to be okay if we have grit and determination, then we have an Instagram culture of fake highlight reels where anyone having their own struggles with hopelessness will just feel even worse in their isolation. I certainly posted my way through my fair share of pretty bleak mental health issues during the worst of the pandemic.
But we should recognize that while sadness is a feeling, hopelessness is a problem, a bad reaction to that feeling, one that needs to be addressed if we are going to collectively dig ourselves out of the problem that creates the sadness in the first place. We may not be able to conjure hope all the time, but we should always be trying.
When we try to address these feelings, as I said earlier, Pollyanna-ism doesn’t help. The antidote to hopelessness is not optimism, but curiosity. If you have a strong thought like “people these days just don’t care about other people1”, yelling “YES THEY DO” at yourself (or worse, your audience) is unlikely to make much of a change, and certainly not likely to be convincing to an audience. Instead, you could ask yourself some questions, and use them for a jumping-off point for some research:
- Why do I think this — is the problem in my perception, or in the world?
- If there is a problem in my perception, is this a common misperception? If it’s common, what is leading to it being common? If it’s unique to me, what sort of work do I need to do to correct it?
- If the problem is real, what are its causes? Is there anything that I, or my audience, could do to address those causes?
The answers to these questions also inform step 6 of the process I outlined above: the doing stuff part of the process.
At some level, all communication is persuasive communication. Everything you say that another person might hear, everything you say that a person might hear, is part of a sprachspiel where you are attempting to achieve something. There is always an implied call to action; even “do nothing, accept the status quo” is itself an action. My call to action right now is to ask you to never make your call to action “you should feel bad, and you should feel bad about feeling bad”. When you communicate in public, your words have power.
Use that power for good.
Acknowledgments
Thank you to my patrons who are supporting my writing on this blog. If you like what you’ve read here and you’d like to read more of it, or you’d like to support my various open-source endeavors, you can support my work as a sponsor! Special thanks also to Cassandra Granade, who provided some editorial feedback on this post; any errors, of course, remain my own.
-
I should also note that vague sentiments of this form, “things used to be better, now they’re getting worse”, are at their core a reactionary yearning for a prelapsarian past, which is both not a good look and also often wrong in a very common way. Complaining about how “people” are getting worse is a very short journey away from complaining about kids these days, which has a long and embarrassing history of being comprehensively incorrect in every era. ↩
Python Engineering at Microsoft
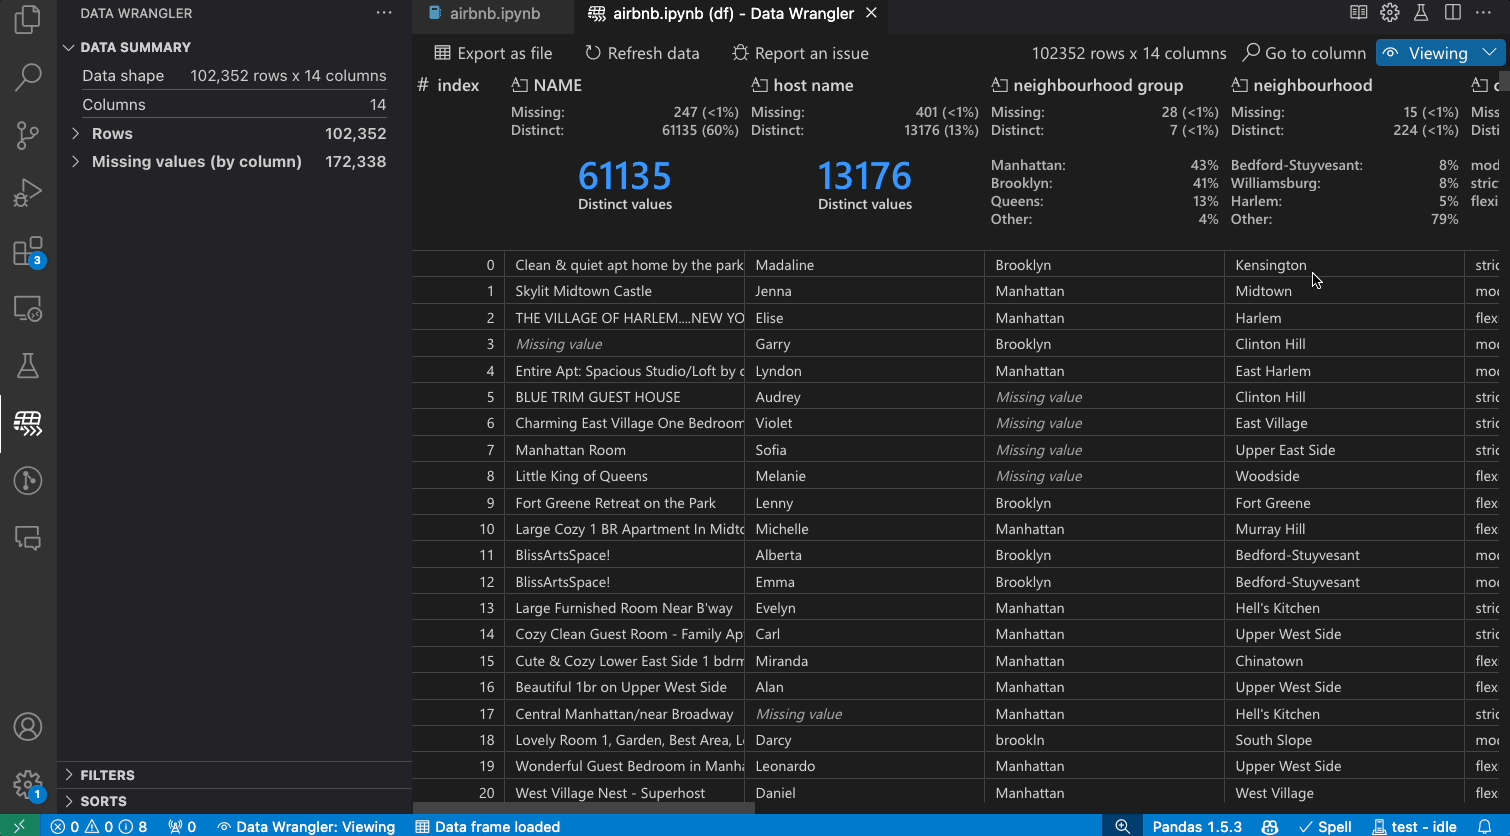
Announcing Data Wrangler: Code-centric viewing and cleaning of tabular data in Visual Studio Code
Today, we are excited to announce the general availability of the Data Wrangler extension for Visual Studio Code! Data Wrangler is a free extension that offers data viewing and cleaning that is directly integrated into VS Code and the Jupyter extension. It provides a rich user interface to view and analyze your data, show insightful column statistics and visualizations, and automatically generate Pandas code as you clean and transform the data. We want to thank all the early adopters who tried out the extension preview over the past year, as your valuable feedback has been crucial to this release.
With this general availability, we are also announcing that the data viewer feature in the Jupyter extension will be going away. In its place, you will be able to use the new and improved data viewing experience offered by Data Wrangler, which is also built by Microsoft. We understand that the data viewer was a beloved feature from our customers, and we see this as the next evolution to working with data in VS Code in an extensible manner and hope that you will love the Data Wrangler extension even more than the data viewer feature. Several of the improvements and features of Data Wrangler are highlighted below.
Previewing data
Once the Data Wrangler extension is installed, you can get to Data Wrangler in one of three ways from the Jupyter Notebook.

- In the Jupyter > Variables panel, beside any supported data object, you can see a button to open it in Data Wrangler.
- If you have a supported data object in your notebook (such as a Pandas DataFrame), you can now see an Open ‘df’ in Data Wrangler button (where ‘df’ is the variable name of your data frame) appear in bottom of the cell after running code that outputs the data frame. This includes df.head(), df.tail(), display(df), print(df), df.
- In the notebook toolbar, selecting View data brings up a list of every supported data object in your notebook. You can then choose which variable in that list you want to open in Data Wrangler.
Alternatively, Data Wrangler can also be directly opened from a local file (such as CSV, Excel, or parquet files) by right clicking the file and selecting “Open in Data Wrangler”.
Filtering and sorting
Data Wrangler can be used to quickly filter and sort through your rows of data.
Transforming data
Switch from Viewing to Editing mode to unlock additional functionality and built-in data cleaning operations in Data Wrangler. For a full list of supported operations, see the documentation here.
Code generation
As you make changes to the data using the built-in operations, Data Wrangler automatically generates code using open-source Python libraries for the data transformation operations you perform.
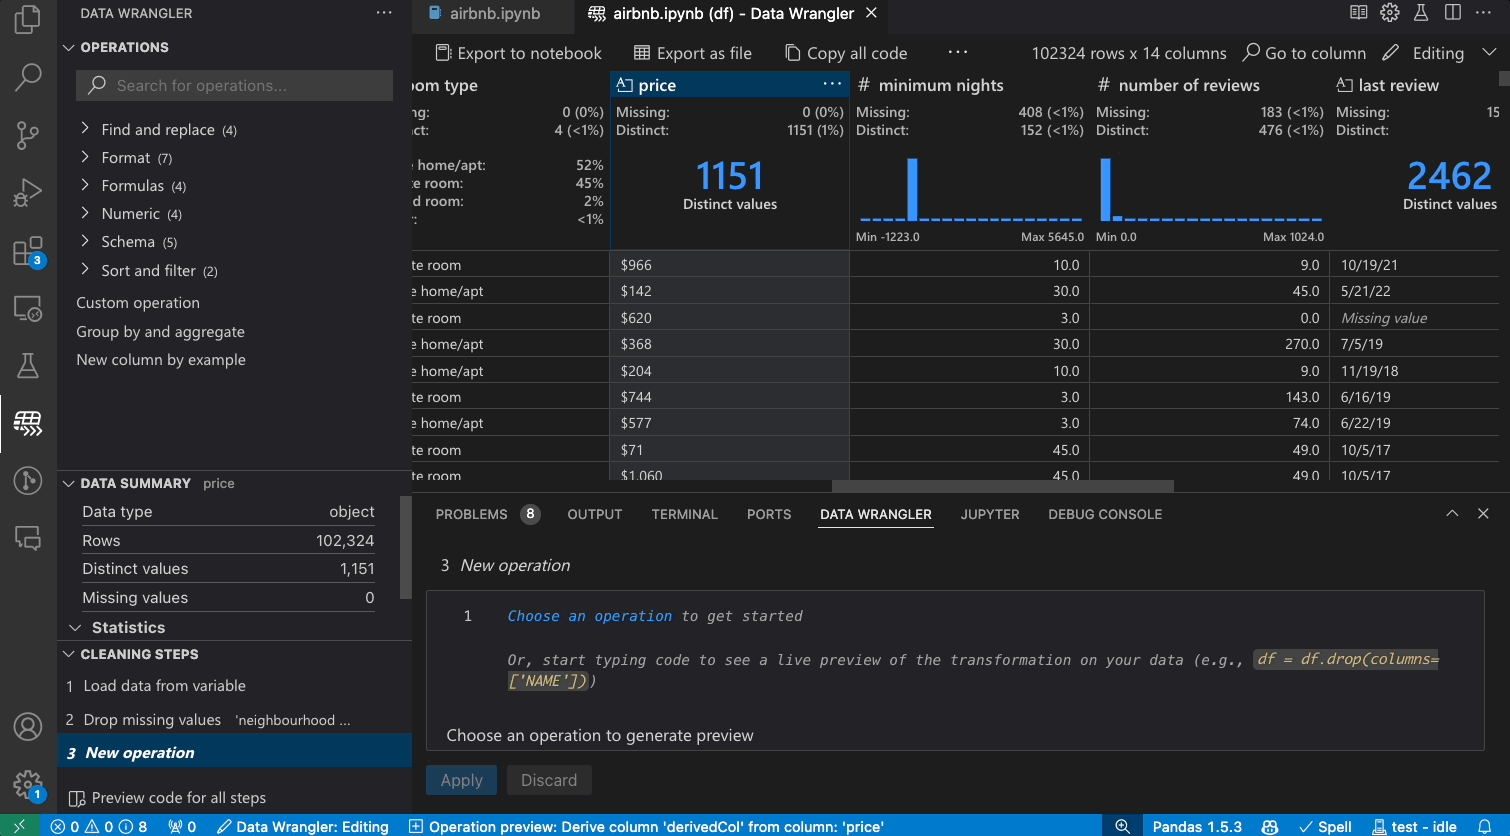
When you are done wrangling your data, all the automatically generated code from your data cleaning session can then be exported either back into your Notebook, or into a new Python file.
Trying Data Wrangler today
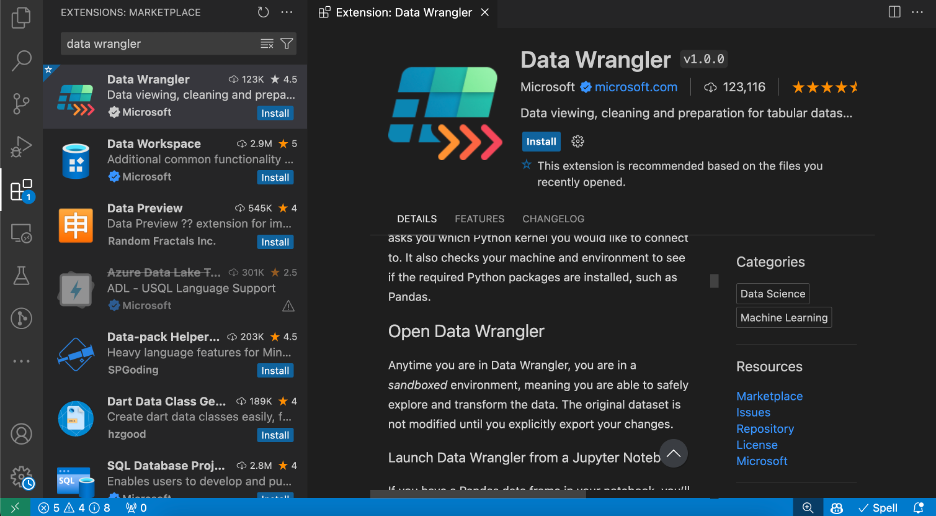
To start using Data Wrangler today in Visual Studio Code, just download the Data Wrangler extension from the VS Code marketplace to try it out! You can then launch Data Wrangler from any supported data object in a Jupyter Notebook or direct from a data file.
This article only covered some of the high-level features of what Data Wrangler can do. To learn more about Data Wrangler in detail, please check out the Data Wrangler documentation.
The post Announcing Data Wrangler: Code-centric viewing and cleaning of tabular data in Visual Studio Code appeared first on Python.
PyCoder’s Weekly
Issue #628 (May 7, 2024)
#628 – MAY 7, 2024
View in Browser »

TypeIs Does What I Thought TypeGuard Would Do in Python
In this post, Redowan discusses the fact that TypeGuard has always confused him, and that the newer TypeIs feature does what he thought TypeGuard should do. Read on to learn about them both.
REDOWAN DELOWAR
Python’s unittest: Writing Unit Tests for Your Code
In this tutorial, you’ll learn how to use the unittest framework to create unit tests for your Python code. Along the way, you’ll also learn how to create test cases, fixtures, test suites, and more.
REAL PYTHON
Webinar - Make Open Source Suck Less

Tired of dependency conflicts, corrupted environments and “works on my machine” issues? Learn the shortfalls of standard package and environment tools (i.e. pip and venv), and how you can achieve reproducibility, dependency management and security at scale - Watch the Webinar On-Demand →
ACTIVESTATE sponsor
Avoid Conflicts and Let Your OS Select a Python Web App Port
Hard-coded port numbers can be problematic during development because they prevent you from running multiple instances of the same server process in parallel. This article explains how to work around this issue by letting your operating system automatically select a random port number.
CHRISTOPH SCHIESSL • Shared by Christoph Schiessl
Quiz: The Python Calendar Module
In this quiz, you’ll test your understanding of the calendar module in Python. It’ll evaluate your proficiency in manipulating, customizing, and displaying calendars directly within your terminal. By working through this quiz, you’ll revisit the fundamental functions and methods provided by the calendar module.
REAL PYTHON
Quiz: What Is the __pycache__ Folder in Python?
In this quiz, you’ll have the opportunity to test your knowledge of the __pycache__ folder, including when, where, and why Python creates these folders.
REAL PYTHON
Discussions
Everything Google’s Python Team Were Responsible For
Google recently laid off the majority of their internal Python team. This post to HN, from one of the former team members, covers just what that team was responsible for. The ensuing discussion also includes comments from others on that team as well.
HACKER NEWS
Python Jobs
Senior Python Engineer: Generative AI, Social Media x Web3 (Anywhere)
Articles & Tutorials
Working With Global Variables in Python Functions
In this video course, you’ll learn how to use global variables in Python functions using the global keyword or the built-in globals() function. You’ll also learn a few strategies to avoid relying on global variables because they can lead to code that’s difficult to understand, debug, and maintain.
REAL PYTHON course
Embarking on a Relaxed and Friendly Python Coding Journey
Do you get stressed while trying to learn Python? Do you prefer to build small programs or projects as you continue your coding journey? This week on the show, Real Python author Stephen Gruppetta is here to talk about his new book, “The Python Coding Book.”
REAL PYTHON podcast
How to Watermark a Graph With Matplotlib
“Matplotlib is one of the most popular data visualization packages for the Python programming language. It allows you to create many different charts and graphs.” With it you can even put a watermark on your charts, this tutorial shows you how.
MIKE DRISCOLL
Software Friction
Friction is everywhere in software development. Two setbacks are more than twice as bad as one setback. This article discusses the sources of software friction and what you can do about it.
HILLEL WAYNE
The Magician’s Sleight of Hand
Even functions in Python are objects and can be re-assigned and manipulated. This article shows a problem that at first looks impossible, but can be handled with a few key re-assigments.
STEPHEN GRUPPETTA • Shared by Stephen Gruppetta
4 Software Design Principles I Learned the Hard Way
Leonardo talks about four principles of software engineering he’s learned though his career. Some are against common practice: DRY may not be you friend.
LEONARDO CREED
Isolating Risk in the CPython Release Process
This is a quick summary of the changes to the CPython build process to help reduce the risks caused by extra dependencies.
SETH LARSON
Building Reusable Components in Django
This tutorial looks at how to build server-side, reusable UI components in Django using the django-viewcomponent library.
MICHAEL YIN • Shared by Michael Herman
Projects & Code
Events
Python Atlanta
May 9 to May 10, 2024
MEETUP.COM
DFW Pythoneers 2nd Saturday Teaching Meeting
May 11, 2024
MEETUP.COM
PiterPy Meetup
May 14, 2024
PITERPY.COM
Leipzig Python User Group Meeting
May 14, 2024
MEETUP.COM
IndyPy Monthly Meetup
May 14 to May 15, 2024
MEETUP.COM
PyCon US 2024
May 15 to May 24, 2024
PYCON.ORG
Flask Con 2024
May 17 to May 18, 2024
FLASKCON.COM
Happy Pythoning!
This was PyCoder’s Weekly Issue #628.
View in Browser »
[ Subscribe to 🐍 PyCoder’s Weekly 💌 – Get the best Python news, articles, and tutorials delivered to your inbox once a week >> Click here to learn more ]
Python Software Foundation
PSF Board Election Dates for 2024
PSF Board elections are a chance for the community to choose representatives to help the PSF create a vision for and build the future of the Python community. This year there are 3 seats open on the PSF board. Check out who is currently on the PSF Board. (Débora Azevedo, Kwon-Han Bae, and Tania Allard are at the end of their current terms.)
Board Election Timeline
- Nominations open: Tuesday, June 11th, 2:00 pm UTC
- Nomination cut-off: Tuesday, June 25th, 2:00 pm UTC
- Voter application/affirmation cut-off date: Tuesday, June 25th, 2:00 pm UTC
- Announce candidates: Thursday, June 27th
- Voting start date: Tuesday, July 2nd, 2:00 pm UTC
- Voting end date: Tuesday, July 16th, 2:00 pm UTC
Voting
You must be a contributing, managing, supporting, or fellow member by June 25th to vote in this election. Check out the PSF membership page to learn more about membership classes and benefits. If you have questions about membership or nominations please email psf-elections@pyfound.org
Run for the Board
Who runs for the board? People who care about the Python community, who want to see it flourish and grow, and also have a few hours a month to attend regular meetings, serve on committees, participate in conversations, and promote the Python community. Check out our Life as Python Software Foundation Director video to learn more about what being a part of the PSF Board entails. We also invite you to review our Annual Impact Report for 2023 to learn more about the PSF mission and what we do.
You can nominate yourself or someone else. We would encourage you to reach out to folks before you nominate them to make sure they are enthusiastic about the potential of joining the Board. Nominations open on Tuesday, June 11th, 2:00 pm UTC, so you have a few weeks to research the role and craft a nomination statement.
Learn more and join the discussion
You are welcome to join the discussion about the PSF Board election on our forum. This year we’ll also be running Office Hours on the PSF Discord to answer questions about running for the board and serving on the board. Details for the Office Hours will be announced soon! Subscribe to the PSF blog or join psf-member-announce to receive updates leading up to the election.
Python Anywhere
CPU resetting issues report: 3 - 5 May 2024
tl;dr
We have a number of background processes that execute periodically on our systems; one of these is the one that resets the amount of CPU used, so that you get a fresh allowance every day. Early in the morning of 2024-05-03, on our US-hosted system, that service failed silently.
Unfortunately, we only realized it was not working on the morning of 2024-05-04. Putting a fix in place required another day.
At the same time, our load balancing system was experiencing a DDoS attack by malicious bots, which led to an overall decline of performance.
For some of our users, who noticed the CPU issue, these two separate events correlated, leading to confusion.
These issues appeared only on our US-based system – users on our EU system were not affected.
Django Weblog
Django bugfix releases issued: 5.0.6 and 4.2.13
Today we've issued 5.0.6 and 4.2.13 as reissues of the 5.0.5 and 4.2.12 bugfix releases.
The release package and checksums are available from our downloads page, as well as from the Python Package Index. The PGP key ID used for this release is Natalia Bidart: 2EE82A8D9470983E.
Real Python
Flattening a List of Lists in Python
Sometimes, when you’re working with data, you may have the data as a list of nested lists. A common operation is to flatten this data into a one-dimensional list in Python. Flattening a list involves converting a multidimensional list, such as a matrix, into a one-dimensional list.
In this video course, you’ll learn how to do that in Python.
[ Improve Your Python With 🐍 Python Tricks 💌 – Get a short & sweet Python Trick delivered to your inbox every couple of days. >> Click here to learn more and see examples ]
Shannon -jj Behrens
Python: My Favorite Python Tricks for LeetCode Questions
I've been spending a lot of time practicing on LeetCode recently, so I thought I'd share some of my favorite intermediate-level Python tricks. I'll also cover some newer features of Python you may not have started using yet. I'll start with basic tips and then move to more advanced ones.
Get help()
Python's documentation is pretty great, and some of these examples are taken from there.
For instance, if you just google "heapq", you'll see the official docs for heapq, which are often enough.
However, it's also helpful to sometimes just quickly use help() in the shell. Here, I can't remember that push() is actually called append().
>>> help([])

>>> dir([])

>>> help([].append)
enumerate()
If you need to loop over a list, you can use enumerate() to get both the item as well as the index. As a mnemonic, I like to think for (i, x) in enumerate(...):
for (i, x) in enumerate(some_list):
    ...
items()
Similarly, you can get both the key and the value at the same time when looping over a dict using items():
for (k, v) in some_dict.items():
    ...
[] vs. get()
Remember, when you use [] with a dict, if the value doesn't exist, you'll get a KeyError. Rather than see if an item is in the dict and then look up its value, you can use get():
val = some_dict.get(key)  # It defaults to None.
if val is None:
    ...
Similarly, .setdefault() is sometimes helpful.
Some people prefer to just use [] and handle the KeyError since exceptions aren't as expensive in Python as they are in other languages.
range() is smarter than you think
for item in range(items):
    ...

for index in range(len(items)):
    ...

# Count by 2s.
for i in range(0, 100, 2):
    ...

# Count backward from 100 to 0 inclusive.
for i in range(100, -1, -1):
    ...

# Okay, Mr. Smarty Pants, I'm sure you knew all that, but did you know
# that you can pass a range object around, and it knows how to reverse
# itself via slice notation? :-P
r = range(100)
r = r[::-1]  # range(99, -1, -1)
print(f'') debugging
Have you switched to Python's new format strings yet? They're more convenient and safer (from injection vulnerabilities) than % and .format(). They even have a syntax for outputing the thing as well as its value:
# Got 2+2=4
print(f'Got {2+2=}')
for else
Python has a feature that I haven't seen in other programming languages. Both for and while can be followed by an else clause, which is useful when you're searching for something.
for item in some_list:
    if is_what_im_looking_for(item):
        print(f"Yay! It's {item}.")
        break
else:
    print("I couldn't find what I was looking for.")
Use a list as a stack
The cost of using a list as a stack is (amortized) O(1):
elements = []
elements.append(element)  # Not push
element = elements.pop()
Note that inserting something at the beginning of the list or in the middle is more expensive it has to shift everything to the right--see deque below.
sort() vs. sorted()
# sort() sorts a list in place.
my_list.sort()

# Whereas sorted() returns a sorted *copy* of an iterable:
my_sorted_list = sorted(some_iterable)
And, both of these can take a key function if you need to sort objects.
set and frozenset
Sets are so useful for so many problems! Just in case you didn't know some of these tricks:
# There is now syntax for creating sets.
s = {'Von'}

# There are set "comprehensions" which are like list comprehensions, but for sets.
s2 = {f'{name} the III' for name in s}
{'Von the III'}

# If you can't remember how to use union, intersection, difference, etc.
help(set())

# If you need an immutable set, for instance, to use as a dict key, use frozenset.
frozenset((1, 2, 3))
deque
If you find yourself needing a queue or a list that you can push and pop from either side, use a deque:
>>> from collections import deque
>>>
>>> d = deque()
>>> d.append(3)
>>> d.append(4)
>>> d.appendleft(2)
>>> d.appendleft(1)
>>> d
deque([1, 2, 3, 4])
>>> d.popleft()
1
>>> d.pop()
4
Using a stack instead of recursion
Instead of using recursion (which has a depth of about 1024 frames), you can use a while loop and manually manage a stack yourself. Here's a slightly contrived example:
work = [create_initial_work()]
while work:
    work_item = work.pop()
    result = process(work_item)
    if is_done(result):
        return result
    work.append(result.pieces[0])
    work.append(result.pieces[1])
Using yield from
If you don't know about yield, you can go spend some time learning about that. It's awesome.
Sometimes, when you're in one generator, you need to call another generator. Python now has yield from for that:
def my_generator():
    yield 1
    yield from some_other_generator()
    yield 6
So, here's an example of backtracking:
class Solution:
    def problem(self, digits: str) -> List[str]:
        def generate_possibilities(work_so_far, remaining_work):
            if not remaining_work:
                if work_so_far:
                    yield work_so_far
                return
            first_part, remaining_part = remaining_work[0], remaining_work[1:]
            for i in things_to_try:
                yield from generate_possibilities(work_so_far + i, remaining_part)

        output = list(generate_possibilities(no_work_so_far, its_all_remaining_work))
        return output
This is appropriate if you have less than 1000 "levels" but a ton of possibilities for each of those levels. This won't work if you're going to need more than 1000 layers of recursion. In that case, switch to "Using a stack instead of recursion".
Updated: On the other hand, if you can have the recursive function append to some list of answers instead of yielding it all the way back to the caller, that's faster.
Pre-initialize your list
If you know how long your list is going to be ahead of time, you can avoid needing to resize it multiple times by just pre-initializing it:
dp = [None] * len(items)
collections.Counter()
How many times have you used a dict to count up something? It's built-in in Python:
>>> from collections import Counter
>>> c = Counter('abcabcabcaaa')
>>> c
Counter({'a': 6, 'b': 3, 'c': 3})
defaultdict
Similarly, there's defaultdict:
>>> from collections import defaultdict
>>> d = defaultdict(list)
>>> d['girls'].append('Jocylenn')
>>> d['boys'].append('Greggory')
>>> d
defaultdict(<class 'list'>, {'girls': ['Jocylenn'], 'boys': ['Greggory']})
Notice that I didn't need to set d['girls'] to an empty list before I started appending to it.
heapq
I had heard of heaps in school, but I didn't really know what they were. Well, it turns out they're pretty helpful for several of the problems, and Python has a list-based heap implementation built-in.
If you don't know what a heap is, I recommend this video and this video. They'll explain what a heap is and how to implement one using a list.
The heapq module is a built-in module for managing a heap. It builds on top of an existing list:
import heapq

some_list = ...
heapq.heapify(some_list)

# The head of the heap is some_list[0].
# The len of the heap is still len(some_list).

heapq.heappush(some_list, item)
head_item = heapq.heappop(some_list)
The heapq module also has nlargest and nsmallest built-in so you don't have to implement those things yourself.
Keep in mind that heapq is a minheap. Let's say that what you really want is a maxheap, and you're not working with ints, you're working with objects. Here's how to tweak your data to get it to fit heapq's way of thinking:
heap = []
heapq.heappush(heap, (-obj.value, obj))

(ignored, first_obj) = heapq.heappop()
Here, I'm using - to make it a maxheap. I'm wrapping things in a tuple so that it's sorted by the obj.value, and I'm including the obj as the second value so that I can get it.
Use bisect for binary search
I'm sure you've implemented binary search before. Python has it built-in. It even has keyword arguments that you can use to search in only part of the list:
import bisect

insertion_point = bisect.bisect_left(sorted_list, some_item, lo=lo, high=high)
Pay attention to the key argument which is sometimes useful, but may take a little work for it to work the way you want.
namedtuple and dataclasses
Tuples are great, but it can be a pain to deal with remembering the order of the elements or unpacking just a single element in the tuple. That's where namedtuple comes in.
>>> from collections import namedtuple
>>> Point = namedtuple('Point', ['x', 'y'])
>>> p = Point(5, 7)
>>> p
Point(x=5, y=7)
>>> p.x
5
>>> q = p._replace(x=92)
>>> p
Point(x=5, y=7)
>>> q
Point(x=92, y=7)
Keep in mind that tuples are immutable. I particularly like using namedtuples for backtracking problems. In that case, the immutability is actually a huge asset. I use a namedtuple to represent the state of the problem at each step. I have this much stuff done, this much stuff left to do, this is where I am, etc. At each step, you take the old namedtuple and create a new one in an immutable way.
Updated: Python 3.7 introduced dataclasses. These have multiple advantages:
- They can be mutable or immutable (although, there's a small performance penalty).
- You can use type annotations.
- You can add methods.
from dataclasses import dataclass

@dataclass  # Or: @dataclass(frozen=True)
class InventoryItem:
    """Class for keeping track of an item in inventory."""
    name: str
    unit_price: float
    quantity_on_hand: int = 0

    def total_cost(self) -> float:
        return self.unit_price * self.quantity_on_hand

item = InventoryItem(name='Box', unit_price=19, quantity_on_hand=2)
dataclasses are great when you want a little class to hold some data, but you don't want to waste much time writing one from scratch.
Updated: Here's a comparison between namedtuples and dataclasses. It leads me to favor dataclasses since they have faster property access and use 30% less memory :-/ Per the Python docs, using frozen=True is slightly slower than not using it. In my (extremely unscientific) testing, using a normal class with __slots__ is faster and uses less memory than a dataclass.
int, decimal, math.inf, etc.
Thankfully, Python's int type supports arbitrarily large values by default:
>>> 1 << 128
340282366920938463463374607431768211456
There's also the decimal module if you need to work with things like money where a float isn't accurate enough or when you need a lot of decimal places of precision.
Sometimes, they'll say the range is -2 ^ 32 to 2 ^ 32 - 1. You can get those values via bitshifting:
>>> -(2 ** 32) == -(1 << 32)
True
>>> (2 ** 32) - 1 == (1 << 32) - 1
True
Sometimes, it's useful to initialize a variable with math.inf (i.e. infinity) and then try to find new values less than that.
Updated: If you want to save memory by not importing the math module, just use float("inf").
Closures
I'm not sure every interviewer is going to like this, but I tend to skip the OOP stuff and use a bunch of local helper functions so that I can access things via closure:
class Solution():  # This is what LeetCode gave me.
    def solveProblem(self, arg1, arg2):  # Why they used camelCase, I have no idea.

        def helper_function():
            # I have access to arg1 and arg2 via closure.
            # I don't have to store them on self or pass them around
            # explicitly.
            return arg1 + arg2

        counter = 0

        def can_mutate_counter():
            # By using nonlocal, I can even mutate counter.
            # I rarely use this approach in practice. I usually pass in it
            # as an argument and return a value.
            nonlocal counter
            counter += 1

       can_mutate_counter()
       return helper_function() + counter
match statement
Did you know Python now has a match statement?
# Taken from: https://learnpython.com/blog/python-match-case-statement/

>>> command = 'Hello, World!'
>>> match command:
...     case 'Hello, World!':
...         print('Hello to you too!')
...     case 'Goodbye, World!':
...         print('See you later')
...     case other:
...         print('No match found')
It's actually much more sophisticated than a switch statement, so take a look, especially if you've never used match in a functional language like Haskell.
OrderedDict
If you ever need to implement an LRU cache, it'll be quite helpful to have an OrderedDict.
Python's dicts are now ordered by default. However, the docs for OrderedDict say that there are still some cases where you might need to use OrderedDict. I can't remember. If you never need your dicts to be ordered, just read the docs and figure out if you need an OrderedDict or if you can use just a normal dict.
@functools.cache
If you need a cache, sometimes you can just wrap your code in a function and use functools.cache:
from functools import cache

@cache
def factorial(n):
    return n * factorial(n - 1) if n else 1

print(factorial(5))
...
factorial.cache_info()  # CacheInfo(hits=3, misses=8, maxsize=32, currsize=8)
Debugging ListNodes
A lot of the problems involve a ListNode class that's provided by LeetCode. It's not very "debuggable". Add this code temporarily to improve that:
def list_node_str(head):
    seen_before = set()
    pieces = []
    p = head
    while p is not None:
        if p in seen_before:
            pieces.append(f'loop at {p.val}')
            break
        pieces.append(str(p.val))
        seen_before.add(p)
        p = p.next
    joined_pieces = ', '.join(pieces)
    return f'[{joined_pieces}]'


ListNode.__str__ = list_node_str
Saving memory with the array module
Sometimes you need a really long list of simple numeric (or boolean) values. The array module can help with this, and it's an easy way to decrease your memory usage after you've already gotten your algorithm working.
>>> import array
>>> array_of_bytes = array.array('b')
>>> array_of_bytes.frombytes(b'\0' * (array_of_bytes.itemsize * 10_000_000))
Pay close attention to the type of values you configure the array to accept. Read the docs.
I'm sure there's a way to use individual bits for an array of booleans to save even more space, but it'd probably cost more CPU, and I generally care about CPU more than memory.
Using an exception for the success case rather than the error case
A lot of Python programmers don't like this trick because it's equivalent to goto, but I still occasionally find it convenient:
class Eureka(StopIteration):
    """Eureka means "I found it!" """
    pass


def do_something_else():
    some_value = 5
    raise Eureka(some_value)


def do_something():
    do_something_else()


try:
    do_something()
except Eureka as exc:
    print(f'I found it: {exc.args[0]}')
Updated: Enums
from enum import Enum

# Either:
class Color(Enum):
    RED = 1
    GREEN = 2
    BLUE = 3

# Or:
Color = Enum('Color', ['RED', 'GREEN', 'BLUE'])
RED = "RED"
GREEN = "GREEN"
BLUE = "BLUE"
Updated: Using a profiler
import cProfile
cProfile.run("Solution().someMethod(sampleData)")
Using VS Code, etc.
VS Code has a pretty nice Python extension. If you highlight the code and hit shift-enter, it'll run it in a shell. That's more convenient than just typing everything directly in the shell. Other editors have something similar, or perhaps you use a Jupyter notebook for this.
Another thing that helps me is that I'll often have separate files open with separate attempts at a solution. I guess you can call this the "fast" approach to branching.
Write English before Python
One thing that helps me a lot is to write English before writing Python. Just write all your thoughts. Keep adding to your list of thoughts. Sometimes you have to start over with a new list of thoughts. Get all the thoughts out, and then pick which thoughts you want to start coding first.
Conclusion
Well, those are my favorite tricks off the top of my head. I'll add more if I think of any.
This is just a single blog post, but if you want more, check out Python 3 Module of the Week.
Marcos Dione
Collating, processing, managing, backing up and serving a gallery of a 350GiB, 60k picture collection
In the last two days I have commented a little bit how I process and manage my photos. I'm not a very avid photographer, I have like 350 gigabytes of photos, most of them are yet not processed, around 60,000 of them. So I will comment a little bit more how do I manage all that.
I start with the camera, a 24Mpx camera, just a couple of lenses, nothing fancy. Go out, take some pictures, come back home.
I put the SD camera on my computer and I use my own software to import it.
The import process is not fancy, it just empties the SD card, checks every file for the
EXIF information, uses the date and time to create the filename, a sequence number if needed,
and puts them all in a single
incoming directory where all the current unprocessed images are1.
Then I use this software I developed in PyQt5.
It's very, very basic, but it's really quick, it's mostly keyboard based. It reads
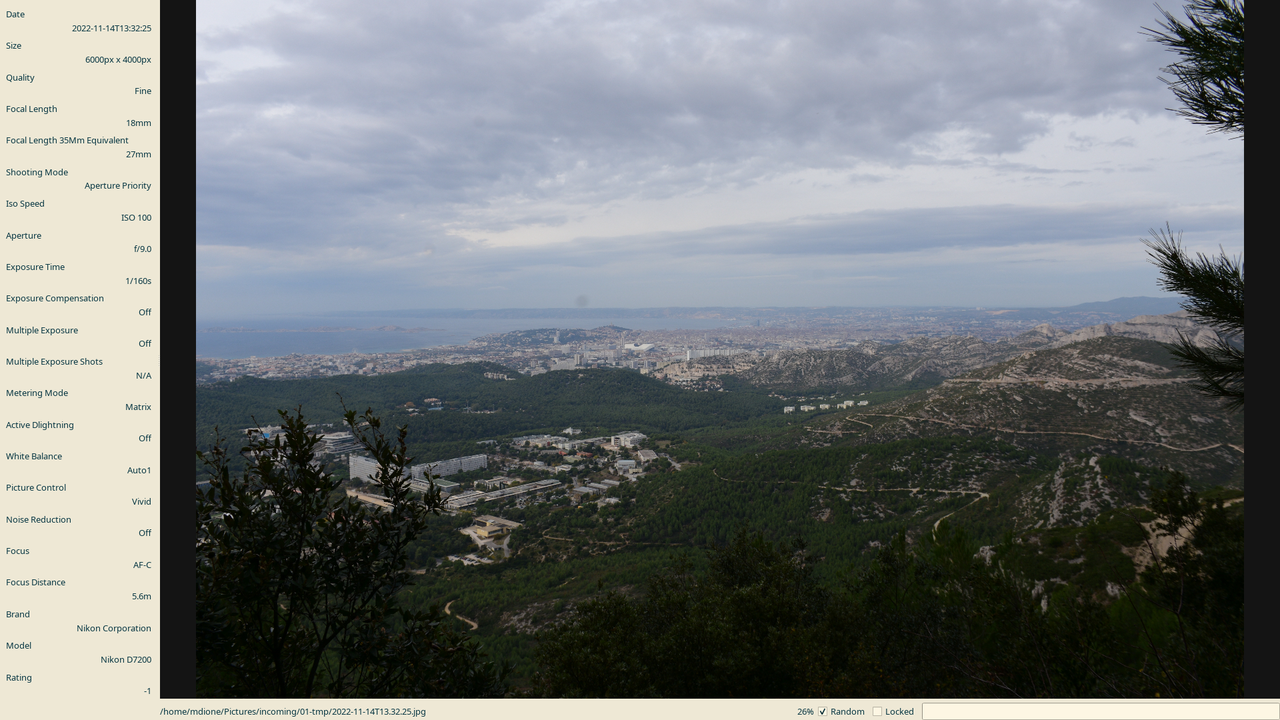
the EXIF information and present some of the tags at the left of the screen; things like date,
time, size, orientation and then focal length, aperture, ISO and various other data I can
get from the images. It's mostly focused on my current camera and the previous one, both Nikons2.
The previous one was an N90, right now it's an N7200.
The image occupies most of the window, and the program is always in full screen.
At the bottom there's the filename and a couple of toggles.
I can do several things with this:
-
Go forwards, backwards, by one, by ten, by a hundred and by a thousand, because that
incomingdirectory right now has almost seven years of history, probably ten thousand pictures. -
Move randomly, which allows me to pick up a new thing to collate when I get bored with the current one but I want to keep doing it to reduce the backlog.
-
Mark the images in different ways. The main ones are about selecting for storing, with two modes: One is to keep the image in the original size. I usually use this for my best landscape or astro photos. The other one will resize it down to twelve megapixels3, from 6000x4000 pixels to 4500x3000 pixels, 75% on each dimension.
- Rotate the images, just in case the camera did not guess the orientation correctly, usually when I'm taking pictures right upward or right downwards.
-
Select several pictures for stitching, which will use
huginto do so. It's not 100% automatic, but at least puts the pictures in astitchdirectory and pointhuginthere. -
Select a picture for cropping or editing; I'm not going to develop a whole image editor, so I just delegate to an existing program,
gwenview. -
Select images for deleting and delete them permanently.
-
Select several images for comparison and enter/exit comparison mode, which means that going backwards and forwards applies only this this set. This is good for things like when you take certain pictures, but there are not necessarily sequences in the original picture sequence, which for me makes culling images faster.
- It has two zoom levels, fit to screen and full size. I don't have much the need for other options.
-
99% of the pictures I take are freehand, so in a sequence there's always some movement between images. In full size I can put every image on its own position, aligning the whole sequence and allow culling based on blurriness or other factors.
-
Also in full size, I can lock the view, so when I pan one of the images and I switch to another one, it will also pan that second image to that position. It also helps when I'm checking for details between two different images of the same thing.
-
Move all the selected images, resize them if needed, and put them in a folder. It also creates a hardlink between my categorization in folders into a folder that collects all the images by date; there's one folder for each month and year with all the pictures of that month inside. It uses hardlinks so it doesn't duplicate the image file, saving space.
-
It also has a readonly mode, so I can hand the computer to my kids to watch the photos.
When culling, I use the comparison mode and individual position and lock view features a lot, going back and forth between images, discarding until only one is left.
That's the first part, the one I must spend my time on, just basic culling, selection and storage. My main tree is just a tree based on my way of categorizing the images.
My program doesn't have a directory view; instead, I just use gwenview again.
Notice there's no photo editing in this workflow. I rarely shoot in RAW for two reasons: a) I'm really bad at postprocessing; and b) even if I was good, I don't have the time to do it; my free time is shared among several hobbies. I only do it for astro photograpy and very few, rare occasions.
The third tool I use is digikam. I use it for two things, which are related:
semi-automatic and manual tagging.
The semi-automatic is face detection; digikam can find and guess faces, but requires manual confirmation4.
The fully manual part is plain tagging, mostly with location5 and sometimes some other info.
I sometimes also rate my pictures; I mostly use four and five, sometimes three, only for my best pictures.
Then there's another script that reads the digikam database and uses
the tags to create another directory for the tags, which also uses hardlinks.
It still doesn't do anything about the rating, but I could easily add that.
That's all on my personal computer. I use rsync to make a copy on my home server that has two purposes.
One, it's a backup, which includes all the original 24Mpx images that I hadn't culled yet,
which I think is the biggest part of my collection.
The second one, it feeds a gallery program that is developed in PHP by a guy named Karl. It's probably the single paid software I use. It's a single PHP file that you put at the root of your gallery, you enable PHP processing by your web server (in my case, Apache), and generates the gallery on the run, just reading the directories and creating all the necessary thumbnails and all that. I did a small change to this program. The original algorithm creates thumbnails based on each file's path (and other attributes, 4 or 5 I think), but because I have all these hard links, it creates duplicated thumbnail files. So I changed it to use the filename instead of the filepath6.
I don't have any kind of synchronization with my phone. Most of the pictures I take with it are not the kind of pictures I usually will put in my own gallery, except the times I go out without my camera and I end up taking pictures anyway. I still don't have a workflow for that, it's mostly manual. So if I ever lose my phone, I'm fscked because I have definitely no backups of it.
That lack of synchronization also means that the only way to see the pictures in my phone is by opening the gallery
in the browser. It's not the best, but I don't do that that often.
I have tried to use alternatives like NextCloud, which I also have installed on my home server.
I have some issues with permissions because, again, this is a backup directory, so it has
all the owner information that belongs to me, instead of the web server.
That means it doesn't have the proper permissions to let NextCloud manage
those files. Luckily files.gallery just needs a subdirectory.
Another reason is that before I was using static gallery generators: sigal, gallerpy or even nikola, which
drives this glob. All those can generate the gallery statically, so serving them is so much easier.
My old home server died at some point and I had to come up with something.
I had a spare old laptop laying around and I used that. Now it's enough to generate the gallery on the fly.
I have plans to make something bigger, but that's for another time.
-
In fact I have another directory for all the unprocessed photos from another era, and I'm thinking of starting a new era. ↩
-
Even if EXIV is a standard for storing tags, there's no standard for the tag names, so every manufacturer has its own sets, that even change between camera lines. For a better idea of what I'm talking about, just peruse
Image::ExifTool's source code. ↩ -
I currently own no screen that is 4500 pixels of width, let alone 6000. Maybe my kids will, but by then Mpx count will be so different that it won't make any sense to accomodate that. Right now storage for me is expensive, so I'll keep it this way. ↩
-
Or rejection: the false positive rate is bigger that I would like, and it doesn't have a way to say 'yes, this is that person, but don't train on this image'. This is the case for pictures where the face is either semi occluded, sometimes painted, sometimes bad lightning, and mostly just blurry. ↩
-
Most of my pictures don't have GPS info, not even the ones in the phone. The latter I only enable when I really need the info later, mostly for mapping. Later I either discard the photo or remove the info. ↩
-
For a while now I'm even making this distinction in my own code, filename vs filepath. ↩
Robin Wilson
Simple segmentation of geospatial images
I had a need to do some segmentation of some satellite imagery the other day, for a client. Years ago I was quite experienced at doing segmentation and classification using eCognition but that was using the university’s license, and I don’t have a license myself (and they’re very expensive). So, I wanted a free solution.
First, however, let’s talk a little bit about what segmentation is (thanks to Sonya in the comments for pointing out that I didn’t cover this!). Segmentation is a way of splitting an image up into groups of adjacent pixels (‘segments’ or ‘objects’) that ‘look right’ and, ideally, represent objects in the image. For example, an image of cells from a microscope might be segmented into individual cells, or individual organelles inside the cell (depending on the scale), a satellite image might be segmented into fields, clumps of urban area or individual buildings/swimming pools/driveways – again, depending on the scale. Segmentation uses properties of the image (like colour, texture, sharp lines etc) to try and identify these segments.
Once you’ve segmented an image, you can then do things with the segments – for example, you can classify each segment into a different category (building, road, garden, lake). This is often easier than classifying individual pixels, as you have group statistics about the segment (not just ‘value in the red band’, but a whole histogram of values in the red band, plus mean, median, max etc, plus texture measures and more). Sometimes you may want to use the segment outlines themselves as part of your output (eg. as building outlines), other times they are just used as a way of doing something else (like classification). This whole approach to image processing is often known as Object-based Image Analysis.
There are various segmentation tools in the scikit-image library, but I’ve often struggled using them on satellite or aerial imagery – the algorithms seem better suited to images with a clear foreground and background.
Luckily, I remembered RSGISLib – a very comprehensive library of remote sensing and GIS functions. I last used it many years ago, when most of the documentation was for using it from C++, and installation was a pain. I’m very pleased to say that installation is nice and easy now, and all of the examples are in Python.
So, doing segmentation – using an algorithm specifically designed for segmenting satellite/aerial images – is actually really easy now. Here’s how:
First, install RSGISLib. By far the easiest way is to use conda, but there is further documentation on other installation methods, and there are Docker containers available.
conda install -c conda-forge rsgislibThen it’s a simple matter of calling the relevant function from Python. The documentation shows the segmentation functions available, and the one you’re most likely to want to use is the Shepherd segmentation algorithm, which is described in this paper). So, to call it, run something like this:
from rsgislib.segmentation.shepherdseg import run_shepherd_segmentation

run_shepherd_segmentation(input_image, output_seg_image,
                          gdalformat=’GTiff’,
                          calc_stats=False,
                          num_clusters=20,
                          min_n_pxls=300)
The parameters are fairly self-explanatory – it will take the input_image filename (any GDAL-supported format will work), produce an output in output_seg_image filename in the gdalformat given. The calc_stats parameter is important if you’re using a format like GeoTIFF, or any format that doesn’t support a Raster Attribute Table (these are mostly supported by somewhat more unusual formats like KEA). You’ll need to set it to False if your format doesn’t support RATs – and I found that if I forgot to set it to false then the script crashed when trying to write stats.
The final two parameters control how the segmentation algorithm itself works. I’ll leave you to read the paper to find out the details, but the names are fairly self-explanatory.
The output of the algorithm will look something like this:

It’s a raster where the value of all the pixels in the first segment are 1, the pixels in the second segment are 2, and so on. The image above uses a greyscale ‘black to white’ colormap, so as the values of the segments increase towards the bottom of the image, they show as more white.
You can convert this raster output to a set of vector polygons, one for each segment, by using any standard raster to vector ‘polygonize’ algorithm. The easiest is probably using GDAL, by running a command like:
gdal_polygonize.py SegRaster.tif SegVector.gpkgThis will give you a result that looks like the red lines on this image:

So, there’s a simple way of doing satellite image segmentation in Python. I hope it was useful.
Python Bytes
#382 A Simple Game
<strong>Topics covered in this episode:</strong><br> <ul> <li><a href="https://github.com/nektos/act"><strong>act: Run your GitHub Actions locally!</strong> </a></li> <li><a href="https://portr.dev">portr</a></li> <li><a href="https://rednafi.com/python/annotate_args_and_kwargs/"><strong>Annotating args and kwargs in Python</strong></a></li> <li><a href="https://github.com/Envoy-VC/awesome-badges">github badges</a></li> <li><strong>Extras</strong></li> <li><strong>Joke</strong></li> </ul><a href='https://www.youtube.com/watch?v=v3x4WqEwamg' style='font-weight: bold;'data-umami-event="Livestream-Past" data-umami-event-episode="382">Watch on YouTube</a><br> <p><strong>About the show</strong></p> <p>Sponsored by ScoutAPM: <a href="https://pythonbytes.fm/scout">pythonbytes.fm/scout</a></p> <p><strong>Connect with the hosts</strong></p> <ul> <li>Michael: <a href="https://fosstodon.org/@mkennedy"><strong>@mkennedy@fosstodon.org</strong></a></li> <li>Brian: <a href="https://fosstodon.org/@brianokken"><strong>@brianokken@fosstodon.org</strong></a></li> <li>Show: <a href="https://fosstodon.org/@pythonbytes"><strong>@pythonbytes@fosstodon.org</strong></a></li> </ul> <p>Join us on YouTube at <a href="https://pythonbytes.fm/stream/live"><strong>pythonbytes.fm/live</strong></a> to be part of the audience. Usually Tuesdays at 11am PT. Older video versions available there too.</p> <p>Finally, if you want an artisanal, hand-crafted digest of every week of </p> <p>the show notes in email form? Add your name and email to <a href="https://pythonbytes.fm/friends-of-the-show">our friends of the show list</a>, we'll never share it.</p> <p><strong>Brian #1:</strong> <a href="https://github.com/nektos/act"><strong>act: Run your GitHub Actions locally!</strong> </a></p> <ul> <li>Why? <ul> <li>“Fast Feedback - Rather than having to commit/push every time you want to test out the changes you are making to your .github/workflows/ files (or for any changes to embedded GitHub actions), you can use act to run the actions locally. The environment variables and filesystem are all configured to match what GitHub provides.”</li> <li>“Local Task Runner - I love make. However, I also hate repeating myself. With act, you can use the GitHub Actions defined in your .github/workflows/ to replace your Makefile!”</li> </ul></li> <li>Docs: <a href="https://nektosact.com/introduction.html">nektosact.com</a></li> <li>Uses Docker to run containers for each action.</li> </ul> <p><strong>Michael #2:</strong> <a href="https://portr.dev">portr</a></p> <ul> <li>Open source ngrok alternative designed for teams</li> <li>Expose local http, tcp or websocket connections to the public internet</li> <li>Warning: Portr is currently in beta. Expect bugs and anticipate breaking changes.</li> <li><a href="https://portr.dev/server/">Server setup</a> (docker basically).</li> </ul> <p><strong>Brian #3:</strong> <a href="https://rednafi.com/python/annotate_args_and_kwargs/"><strong>Annotating args and kwargs in Python</strong></a></p> <ul> <li>Redowan Delowar</li> <li>I don’t think I’ve ever tried, but this is a fun rabbit hole.</li> <li>Leveraging bits of PEP-5891, PEP-6462, PEP-6553, and PEP-6924.</li> <li><p>Punchline:</p> <pre><code>from typing import TypedDict, Unpack *# Python 3.12+* *# from typing_extensions import TypedDict, Unpack # < Python 3.12* class Kw(TypedDict): key1: int key2: bool def foo(*args: Unpack[tuple[int, str]], **kwargs: Unpack[Kw]) -> None: ... </code></pre></li> <li><p>A recent pic from Redowan’s blog: </p> <ul> <li><a href="https://rednafi.com/python/typeguard_vs_typeis/">TypeIs does what I thought TypeGuard would do in Python</a></li> </ul></li> </ul> <p><strong>Michael #4:</strong> <a href="https://github.com/Envoy-VC/awesome-badges">github badges</a></p> <ul> <li><img src="https://paper.dropboxstatic.com/static/img/ace/emoji/1f60e.png?version=8.0.0" alt="smiling face with sunglasses" /> A curated list of GitHub badges for your next project</li> </ul> <p><strong>Extras</strong> </p> <p>Brian:</p> <ul> <li><a href="https://www.bleepingcomputer.com/news/security/fake-job-interviews-target-developers-with-new-python-backdoor/">Fake job interviews target developers with new Python backdoor</a></li> <li>Later this week, <a href="https://courses.pythontest.com">course.pythontest.com</a> will shift from Teachable to Podia <ul> <li>Same great content. Just a different backend.</li> <li>To celebrate, get 25% off at <a href="https://pythontest.podia.com">pythontest.podia.com</a> now through this Sunday using coupon code PYTEST</li> </ul></li> <li><a href="https://podcast.pythontest.com/episodes/220-juggling-pycon">Getting the most out of PyCon, including juggling - Rob Ludwick</a> <ul> <li>Latest PythonTest episode, also cross posted to <a href="https://pythonpeople.fm">pythonpeople.fm</a></li> </ul></li> <li><a href="https://hci.social/@orion/112167137880858495">3D visualization of dom</a></li> </ul> <p>Michael:</p> <ul> <li><a href="https://djangonaut.space/comms/2024/04/25/2024-opening-session-2/">Djangonauts Space Session 2 Applications</a> Open! More background at <a href="https://talkpython.fm/episodes/show/451/djangonauts-ready-for-blast-off">Djangonauts, Ready for Blast-Off</a> on Talk Python.</li> <li><a href="https://djangochat.com/episodes/michael-kennedy">Self-Hosted Open Source - Michael Kennedy</a> on Django Chat</li> </ul> <p><strong>Joke:</strong> <a href="https://www.reddit.com/r/programminghumor/comments/1ceo0ds/just_a_silly_little_game/">silly games</a></p> <p>Closing song: <a href="https://www.youtube.com/watch?v=pGbodliLFVE">Permission Granted</a></p>
May 06, 2024
Real Python
Python News: What's New From April 2024
In April 2024, Python’s core development team released versions 3.13.0a6 and 3.12.3 of the language! The former received several exciting features, improvements, and optimizations, while the latter got more than 300 commits for security improvements and bug fixes.
The 3.13.0a6 release is the last alpha release. In the first half of May, the code will be frozen and won’t accept new features. Note that 3.13.0a6 is a pre-release, so you shouldn’t use it for production environments. However, it provides a great way to try out some new and exciting language features.
There is also great news about PyCon US 2024, which opened its call for volunteers.
Let’s dive into the most exciting Python news from April 2024!
Python 3.13.0 Alpha 6 and 3.12.3 Arrive
This April, Python released its sixth alpha preview release, 3.13.0a6. This version is the last alpha release, as Python 3.13 will enter the beta phase on May 7. Once in beta, it won’t accept any new features.
Python 3.13 brings the following new features:
- Colorized exception tracebacks are now the default behavior in the interactive interpreter or REPL.
- An experimental JIT compiler that provides the groundwork for significant performance improvements.
- The garbage collector is now incremental, which should make the garbage collection process more efficient.
- Stripped indentation in docstrings reduces memory usage and the size of
.pycfiles.
Meanwhile, the standard library comes with these new features:
- The
dbmmodule has a newdbm.sqlite3backend for creating new files. - PEP 594 scheduled removals of many deprecated modules:
aifc,audioop,chunk,cgi,cgitb,crypt,imghdr,mailcap,msilib,nis,nntplib,ossaudiodev,pipes,sndhdr,spwd,sunau,telnetlib,uu,xdrlib,lib2to3. - Many deprecated classes, functions, and methods (dead batteries) were removed.
- New deprecations appeared, and many of them were scheduled for removal in Python 3.15 or 3.16.
For a detailed list of changes, additions, and removals, you can check out the Changelog document. The next pre-release of Python 3.13 will be 3.13.0b1, which is currently scheduled for May 7.
Read the full article at https://realpython.com/python-news-april-2024/ »
[ Improve Your Python With 🐍 Python Tricks 💌 – Get a short & sweet Python Trick delivered to your inbox every couple of days. >> Click here to learn more and see examples ]
Mike Driscoll
How to Read and Write Parquet Files with Python
Apache Parquet files are a popular columnar storage format used by data scientists and anyone using the Hadoop ecosystem. It was developed to be very efficient in terms of compression and encoding. Check out their documentation if you want to know all the details about how Parquet files work.
You can read and write Parquet files with Python using the pyarrow package.
Let’s learn how that works now!
Installing pyarrow
The first step is to make sure you have everything you need. In addition to the Python programming language, you will also need pyarrow and the pandas package. You will use pandas because it is another Python package that uses columns as a data format and works well with Parquet files.
You can use pip to install both of these packages. Open up your terminal and run the following command:
python -m pip install pyarrow pandas
If you use Anaconda, you’ll want to install pyarrow using this command instead.
conda install -c conda-forge pyarrow
Anaconda should already include pandas, but if not, you can use the same command above by replacing pyarrow with pandas.
Now that you have pyarrow and pandas installed, you can use it to read and write Parquet files!
Writing Parquet Files with Python
Writing Parquet files with Python is pretty straightforward. The code to turn a pandas DataFrame into a Parquet file is about ten lines.
Open up your favorite Python IDE or text editor and create a new file. You can name it something like parquet_file_writer.pyor use some other descriptive name. Then enter the following code:
import pandas as pd
import pyarrow as pa
import pyarrow.parquet as pq


def write_parquet(df: pd.DataFrame, filename: str) -> None:
    table = pa.Table.from_pandas(df)
    pq.write_table(table, filename)


if __name__ == "__main__":
    data = {"Languages": ["Python", "Ruby", "C++"],
            "Users": [10000, 5000, 8000],
            "Dynamic": [True, True, False],
            }
    df = pd.DataFrame(data=data, index=list(range(1, 4)))
    write_parquet(df, "languages.parquet")
For this example, you have three imports:
- One for
pandas, so you can create aDataFrame - One for
pyarrow, to create a specialpyarrow.Tableobject - One for
pyarrow.parquetto transform the table object into a Parquet file
The write_parquet() function takes in a pandas DataFrame and the file name or path to save the Parquet file to. Then, you transform the DataFrame into a pyarrow Table object before converting that into a Parquet File using the write_table() method, which writes it to disk.
Now you are ready to read that file you just created!
Reading Parquet Files with Python
Reading the Parquet file you created earlier with Python is even easier. You’ll need about half as many lines of code!
You can put the following code into a new file called something like parquet_file_reader.pyif you want to:
import pyarrow.parquet as pq

def read_parquet(filename: str) -> None:
    table = pq.read_table(filename)
    df = table.to_pandas()
    print(df)

if __name__ == "__main__":
    read_parquet("languages.parquet")
In this example, you read the Parquet file into a pyarrow Table format and then convert it to a pandas DataFrame using the Table’s to_pandas() method.
When you print out the contents of the DataFrame, you will see the following:
  Languages  Users  Dynamic
1    Python  10000     True
2      Ruby   5000     True
3       C++   8000    False
You can see from the output above that the DataFrame contains all data you saved.
One of the strengths of using a Parquet file is that you can read just parts of the file instead of the whole thing. For example, you can read in just some of the columns rather then the whole file!
Here’s an example of how that works:
import pyarrow.parquet as pq

def read_columns(filename: str, columns: list[str]) -> None:
    table = pq.read_table(filename, columns=columns)
    print(table)

if __name__ == "__main__":
    read_columns("languages.parquet", columns=["Languages", "Users"])
To read in just the “Languages” and “Users” columns from the Parquet file, you pass in the a list that contains just those column names. Then when you call read_table() you pass in the columns you want to read.
Here’s the output when you run this code:
pyarrow.Table
Languages: string
Users: int64
----
Languages: [["Python","Ruby","C++"]]
Users: [[10000,5000,8000]]
This outputs the pyarrow Table format, which differs slightly from a pandas DataFrame. It tells you information about the different columns; for example, Languages are strings, and Users are of type int64.
If you prefer to work only with pandas DataFrames, the pyarrow package allows that too. As long as you know the Parquet file contains pandas DataFrames, you can use read_pandas() instead of read_table().
Here’s a code example:
import pyarrow.parquet as pq

def read_columns_pandas(filename: str, columns: list[str]) -> None:
    table = pq.read_pandas(filename, columns=columns)
    df = table.to_pandas()
    print(df)

if __name__ == "__main__":
    read_columns_pandas("languages.parquet", columns=["Languages", "Users"])
When you run this example, the output is a DataFrame that contains just the columns you asked for:
  Languages  Users
1    Python  10000
2      Ruby   5000
3       C++   8000
One advantage of using the read_pandas() and to_pandas() methods is that they will maintain any additional index column data in the DataFrame, while the pyarrow Table may not.
Reading Parquet File Metadata
You can also get the metadata from a Parquet file using Python. Getting the metadata can be useful when you need to inspect an unfamiliar Parquet file to see what type(s) of data it contains.
Here’s a small code snippet that will read the Parquet file’s metadata and schema:
import pyarrow.parquet as pq

def read_metadata(filename: str) -> None:
    parquet_file = pq.ParquetFile(filename)
    metadata =  parquet_file.metadata
    print(metadata)
    print(f"Parquet file: {filename} Schema")
    print(parquet_file.schema)

if __name__ == "__main__":
    read_metadata("languages.parquet")
There are two ways to get the Parquet file’s metadata:
- Use pq.ParquetFile to read the file and then access the metadata property
- Use pr.read_metadata(filename) instead
The benefit of the former method is that you can also access the schema property of the ParquetFile object.
When you run this code, you will see this output:
<pyarrow._parquet.FileMetaData object at 0x000002312C1355D0>
  created_by: parquet-cpp-arrow version 15.0.2
  num_columns: 4
  num_rows: 3
  num_row_groups: 1
  format_version: 2.6
  serialized_size: 2682
Parquet file: languages.parquet Schema
<pyarrow._parquet.ParquetSchema object at 0x000002312BBFDF00>
required group field_id=-1 schema {
  optional binary field_id=-1 Languages (String);
  optional int64 field_id=-1 Users;
  optional boolean field_id=-1 Dynamic;
  optional int64 field_id=-1 __index_level_0__;
}
Nice! You can read the output above to learn the number of rows and columns of data and the size of the data. The schema tells you what the field types are.
Wrapping Up
Parquet files are becoming more popular in big data and data science-related fields. Python’s pyarrow package makes working with Parquet files easy. You should spend some time experimenting with the code in this tutorial and using it for some of your own Parquet files.
When you want to learn more, check out the Parquet documentation.
The post How to Read and Write Parquet Files with Python appeared first on Mouse Vs Python.
EuroPython Society
🐍 Community Call for Venues - EuroPython 2025
Greetings to all community organizers across Europe! 🌍
We are thrilled to announce the opening of the Call for Venues for EuroPython 2025! 🌐
EuroPython is the world&aposs oldest volunteer-led Python Conference. We are rooted in principles of diversity, inclusion, and accessibility; advocating for the community, and striving to create a welcoming space for all.
It is our mission to ensure accessibility for the wider community of Pythonistas when selecting conference locations. In addition to ticket prices, we carefully consider the ease of access and sustainability of future venues.
Similar to the process followed for the selection of Prague for EuroPython 2023, we would like your help in choosing the most suitable location for our next editions.
If you want to propose a location on behalf of your community, please send as an email to board@europython.eu with your proposal before May 14th. We will coordinate with you to collect all the necessary data required.
📝 Important Notes:
- The EPS will also revisit community proposals from previous years.
- Proposals submitted currently will be retained for future years.
Your city could be the next hub for collaboration, learning, and celebration within the Python ecosystem.
Join us in shaping an unforgettable experience for EuroPython 2025 participants!
✏️ Got any questions/suggestions/comments? Drop us a line at board@europython.eu and we will get back to you.
See you all soon,
EuroPython Society Board
Django Weblog
Django bugfix releases issued: 5.0.5 and 4.2.12
Today we've issued 5.0.5 and 4.2.12 bugfix releases.
The release package and checksums are available from our downloads page, as well as from the Python Package Index. The PGP key ID used for this release is Sarah Boyce: 3955B19851EA96EF.
Zato Blog
What is an API gateway?
What is an API gateway?

In this article, we are going to use Zato in its capacity as a multi-protocol Python API gateway - we will integrate a few popular technologies, accepting requests sent over protocols commonly used in frontend systems, enriching and passing them to backend systems and returning responses to the API clients using their preferred data formats. But first, let's define what an API gateway is.
Clearing up the terminology
Although we will be focusing on complex API integrations later on today, to understand the term API gateway we first need to give proper consideration to the very term gateway.
What comes to mind when we hear the word "gateway", and what is correct etymologically indeed, is an opening in an otherwise impermissible barrier. We use a gateway to access that which is in other circumstances inaccessible for various reasons. We use it to leave such a place too.
In fact, both "gate" and the verb "to go" stem from the same basic root and that, again, brings to mind a notion of passing through space specifically set aside for the purpose of granting access to what normally would be unavailable. And once more, when we depart from such an area, we use a gateway too.
From the perspective of its true intended purpose, a gateway letting everyone in and out as they are would amount to little more than a hole in a wall. In other words, a gateway without a gate is not the whole story.
Yes, there is undoubtedly an immense aesthetic gratification to be drawn from being close to marvels of architecture that virtually all medieval or Renaissance gates and gateways represent, but we know that, nowadays, they do not function to the fullest of their capacities as originally intended.
Rather, we can intuitively say that a gateway is in service as a means of entry and departure if it lets its operators achieve the following, though not necessarily all at the same time, depending on one's particular needs:
- Telling arrivals where they are, including projection of might and self-confidence
- Confirming that arrivals are who they say they are
- Checking if their port of origin is friendly or not
- Checking if they are allowed to enter that which is protected
- Directing them to specific areas behind the gateway
- Keeping a long term and short term log of arrivals
- Answering potential questions right by the gate, if answers are known to gatekeepers
- Cooperating with translators and coordinators that let arrivals make use of what is required during their stay
We can now recognize that a gateway operates on the border of what is internal and external and in itself, it is a relatively narrow, though possibly deep, piece of an architecture. It is narrow because it is only through the gateway that entry is possible but it may be deeper or not, depending on how much it should offer to arrivals.
We also keep in mind that there may very well be more than a single gateway in existence at a time, each potentially dedicated to different purposes, some overlapping, some not.
Finally, it is crucial to remember that gateways are structural, architectural elements - what a gateway should do and how it should do it is a decision left to architects.
With all of that in mind, it is easy to transfer our understanding of what a physical gateway is into what an API one should be.
- API clients should be presented with clear information that they are entering a restricted area
- Source IP addresses or their equivalents should be checked and requests rejected if an IP address or equivalent information is not among the allowed ones
- Usernames, passwords, API keys and similar representations of what they are should be checked by the gateway
- Permissions to access backend systems should be checked seeing as not every API client should have access to everything
- Requests should be dispatched to relevant backend systems
- Requests and responses should be logged in various formats, some meant to be read by programs and applications, some by human operators
- If applicable, responses can be served from the gateway's cache, taking the burden off the shoulders of the backend systems
- Requests and responses can be transformed or enriched which potentially means contacting multiple backend systems before an API caller receives a response
We can now define an API gateway as an element of a systems architecture that is certainly related to security, permissions and granting or rejecting access to backend systems, applications and data sources. On top of it, it may provide audit, data transformation and caching services. The definition will be always fluid to a degree, depending on an architect's vision, but this is what can be expected from it nevertheless.
Having defined what an API gateway is, let's create one in Zato and Python.
Clients and backend systems
In this article, we will integrate two frontend systems and one backend application. Frontend ones will use REST and WebSockets whereas the backend one will use AMQP. Zato will act as an API gateway between them all.
Not granting frontend API clients direct access to backend systems is usually a good idea because the dynamics involved in creation of systems on either side are typically very different. But they still need to communicate and hence the usage of Zato as an API gateway.
Python code
First, let's show the Python code that is needed to integrate the systems in our architecture:
# -*- coding: utf-8 -*-

# Zato
from zato.server.service import Service

class APIGateway(Service):
    """ Dispatches requests to backend systems, enriching them along the way.
    """
    name = 'api.gateway'

    def handle(self):

        # Enrich incoming request with metadata ..
        self.request.payload['_receiver'] = self.name
        self.request.payload['_correlation_id'] = self.cid
        self.request.payload['_date_received'] = self.time.utcnow()

        # .. AMQP configuration ..
        outconn = 'My Backend'
        exchange = '/incoming'
        routing_key = 'api'

        # .. publish the message to an AMQP broker ..
        self.out.amqp.send(data, outconn, exchange, routing_key)

        # .. and return a response to our API client.
        self.response.payload = {'result': 'OK, data accepted'}
There are a couple of points of interest:
-
The gateway service enriches incoming requests with metadata but it could very well enrich it with business data too, e.g. it could communicate with yet another system to obtain required information and only then pass the request to the final backend system(s)
-
In its current form we send all the information to AMQP brokers only but we could just as well send it to other systems, possibly modifying the requests along the way
-
The code is very abstract and all of its current configuration could be moved to a config file, Redis or another data source to make it even more high-level
-
Security configuration and other details are not declared directly in the body of the gateway service but they need to exist somewhere - we will describe it in the next section
Configuration
In Zato, API clients access the platform's services using channels - let's create a channel for REST and WebSockets then.
First REST:
Now WebSockets:
We create a new outgoing AMQP connection in the same way:

Using the API gateway
At this point, the gateway is ready - you can invoke it from REST or WebSockets and any JSON data it receives will be processed by the gateway service, the AMQP broker will receive it, and API clients will have replies from the gateway as JSON responses.
Let's use curl to invoke the REST channel with JSON payload on input:
  $ curl http://api:<password-here>@localhost:11223/api/v1/user ; echo
  curl --data-binary @request.json http://localhost:11223/api/v1/user ; echo
  {"result": "OK, data accepted"}
  $
Taken together, the channels and the service allowed us to achieve this:
- Multiple API clients can access the backend AMQP systems, each client using its own preferred technology
- Client credentials are checked on input, before the service starts to process requests (authentication)
- It is possible to assign RBAC roles to clients, in this way ensuring they have access only to selected parts of the backend API (authorization)
- Message logs keep track of data incoming and outgoing
- Responses from channels can be cached which lessens the burden put on the shoulders of backend systems
- Services accepting requests are free to modify, enrich and transform the data in any way required by business logic. E.g., in the code above we only add metadata but we could as well reach out to other applications before requests are sent to the intended recipients.
We can take it further. For instance, the gateway service is currently completely oblivious to the actual content of the requests.
But, since we just have a regular Python dict in self.request.payload, we can with no effort modify the service to dispatch requests to different backend systems, depending on what the request contains or possibly what other backend systems decide the destination should be.
Such additional logic is specific to each environment or project which is why it is not shown here, and this is also why we end the article at this point, but the central part of it all is already done, the rest is only a matter of customization and plugging in more channels for API clients or outgoing connections for backend systems.
Finally, it is perfectly fine to split access to systems among multiple gateways - each may handle requests from selected technologies on the one hand but on the other hand, each may use different caching or rate-limiting policies. If there is more than one, it may be easier to configure such details on a per-gateway basis.
Next steps
- Read more about using Python in API integrations
- Start the tutorial which will guide you how to design and build Python API services for automation and integrations
Seth Michael Larson
Backup Game Boy ROMs and saves on Ubuntu
Backup Game Boy ROMs and saves on Ubuntu
I'm a big fan of retro video games, specifically the Game Boy Color, Advance, and GameCube collections. The physicality of cartridges, link cables, and accessories before the internet was widely available for gaming has a special place in my heart.
With the recent changes to the App Store to allow emulators (and judging by the influx of issues opened on the Delta emulator GitHub repo) there is a growing interest in playing these games on mobile devices.
So if you're using Ubuntu like me, how can you backup your ROMs and saves?

What you'll need
To backup data from Game Boy cartridges I used the following software and hardware:
- Game Boy, GBC, or GBA cartridge
- GB Operator from Epilogue ($50 USD + shipping)
- Playback software from Epilogue
- Epilogue includes a USB-C to USB-A connector, so an adapter may be needed
There are other options for backing up Game Boy ROMs and saves, some of which are less expensive than the GB Operator, but I went with the GB Operator because it explicitly listed Linux support and from watching reviews appeared to provide a streamlined experience.
Getting started with GB Operator and Playback
Download the Playback AppImage for Linux and the CPU architecture you have. Make the AppImage file executable with:
$ chmod a+x ./Playback.AppImage
If you try to execute this file ($ ./Playback.AppImage) and receive this error:
dlopen(): error loading libfuse.so.2

AppImages require FUSE to run.
You might still be able to extract the contents of this AppImage
if you run it with the --appimage-extract option.
See https://github.com/AppImage/AppImageKit/wiki/FUSE
for more information
You'll need to install FUSE on Ubuntu:
$ sudo apt-get install libfuse2
After this you should be able to run Playback:
$ ./Playback.AppImage
From here the application should launch, but even if you have your GB Operator plugged in there's a chance it won't be detected. There's a good chance that your current user doesn't have access to the USB device. Epilogue provides some guides on how to enable access.
After following the above guide and logging in and out for the changes to take effect your GB Operator should be detected. Connecting a cartridge and navigating to "Data" in the menus provides you with options to "Backup Game" and "Backup Save".
Selecting these options might trigger a crash with the following error when starting the export process:
(Playback.AppImage:44475): Gtk-WARNING **: 15:05:20.886: Could not load a pixbuf from icon theme.
This may indicate that pixbuf loaders or the mime database could not be found.
**
Gtk:ERROR:../../../../gtk/gtkiconhelper.c:494:ensure_surface_for_gicon: assertion failed (error == NULL): Failed to load /usr/share/icons/Yaru/16x16/status/image-missing.png: Unrecognized image file format (gdk-pixbuf-error-quark, 3)
Bail out! Gtk:ERROR:../../../../gtk/gtkiconhelper.c:494:ensure_surface_for_gicon: assertion failed (error == NULL): Failed to load /usr/share/icons/Yaru/16x16/status/image-missing.png: Unrecognized image file format (gdk-pixbuf-error-quark, 3)
Aborted (core dumped)
The fix that worked for me came from a Redditor who talked with Epilogue support and received the following answer:
LD_PRELOAD=/usr/lib/x86_64-linux-gnu/gdk-pixbuf-2.0/2.10.0/loaders/libpixbufloader-svg.so \
  ./Playback.AppImage
Running the AppImage with the LD_PRELOAD value set fixed my issue, I've since added this
shim to an alias, so I don't have to remember it. Hopefully in a future version of Playback
this won't be an issue.
From here backing up your ROMs and saves should work as expected. Happy gaming!
Thanks for reading! ♡ Did you find this article helpful and want more content like it? Get notified of new posts by subscribing to the RSS feed or the email newsletter.
This work is licensed under CC BY-SA 4.0 ![]()
![]()
![]()
HoloViz
Plotting made easy with hvPlot: 0.9 and 0.10 releases